# DOM 101
# Learning Objectives
After completing this lesson, you will be able to:
- Define what the DOM is and what it's used for
- Describe the BOM and DOM and their differences
- Use the
documentglobal variable - Understand DOM tree objects
- Get elements by ID, class name, tag name, and query selector
- Create DOM elements nodes
- Replace the text and
innerHTMLof a node element - Set and get attributes on a created element
- Append and remove elements in the document
# Lesson
In addition to HTML and CSS, a web page can include JavaScript code. JavaScript is able to modify the structure, content, and presentation of a web page without the need to reload. Browsers make this possible through two programming interfaces: the DOM and the BOM.
# What is the DOM?
The Document Object Model (DOM) is a programming interface for HTML and XML documents. It represents the page so that programs can change the document structure, style, and content. The DOM represents the document as nodes and objects. That way, programming languages can connect to the page. MDN - Document Object Model
The DOM is the primary way that your JavaScript code will interact with a web page. Specifically, the browser provides a document variable that has properties and methods you can use to make changes to the page.
# How is the DOM related to the Browser Object Model?
Whereas the DOM represents the web page, the Browser Object Model (the BOM) represents the window or tab that is showing the page.
In JavaScript, the BOM is accessible through a window variable. This variable has a document property. You could say that the BOM (the window) contains a DOM (the document).
But the window object has other useful properties, such as history, screen, and location.
For example, window.screen object contains information about a user's browser, this includes the width and height properties. window.screen.width give you the current width of the browser's window. It can also be written without the window prefix as screen.width.
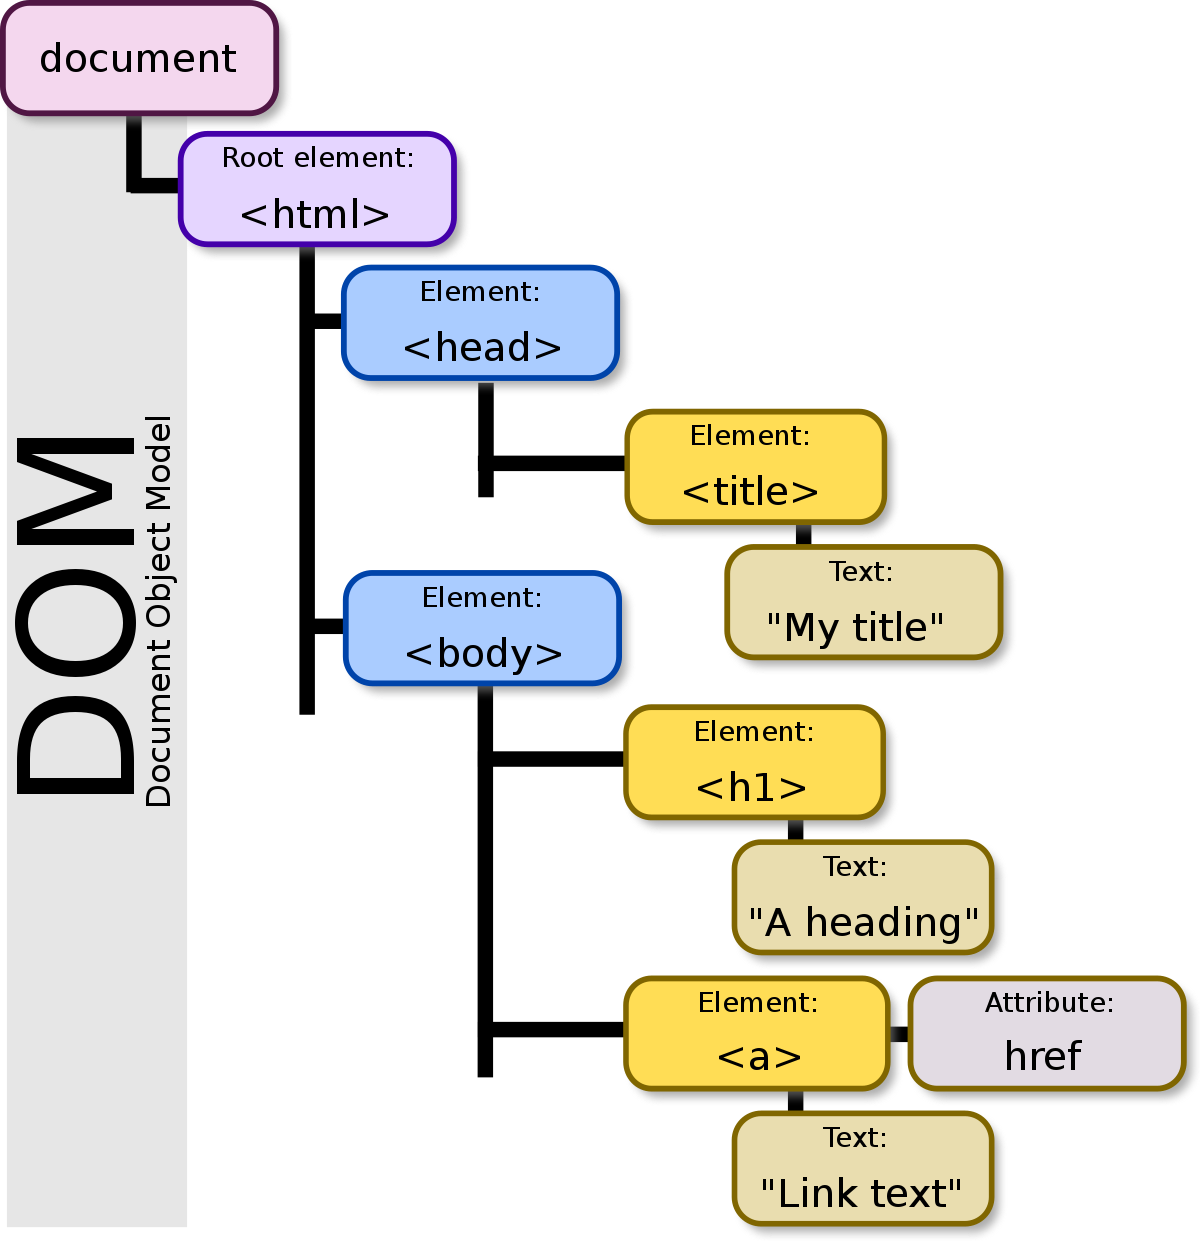
# The Node Tree
The primary job of the browser is to convert an HTML document into a DOM. The structure of the DOM is represented by a "node tree".
Wikipedia - Document Object Model
Each node branches off another forming the 'tree' shown above. Each branch of the tree ends in a node and each node contains objects. The DOM methods allow access to the tree and the nodes contained within.
Nodes can be an element, attribute of an element, text, or basically anything that is part of the HTML document.
# Accessing the DOM
The document interface represents any web page loaded in the browser and serves as an entry point into the web page's node tree.
# DOM Selectors
DOM Selectors are used to access HTML elements within a document. The following selector methods are properties of the document object. This means we must prefix these selectors with the document. to call them.
| Method | Description |
|---|---|
getElementsByTagName('p') | searches HTML document for p tags and returns a list of these elements in an HTMLCollection object. |
getElementsByClassName('link') | returns all the elements that matches the specified class name in an HTMLCollection object. |
getElementById('password') | returns the first element that its id matches the given string. |
querySelector('#password') | returns the first element that matches the specified CSS selector |
querySelectorAll('.link') | returns all the elements that match the specified CSS selector in a NodeList |
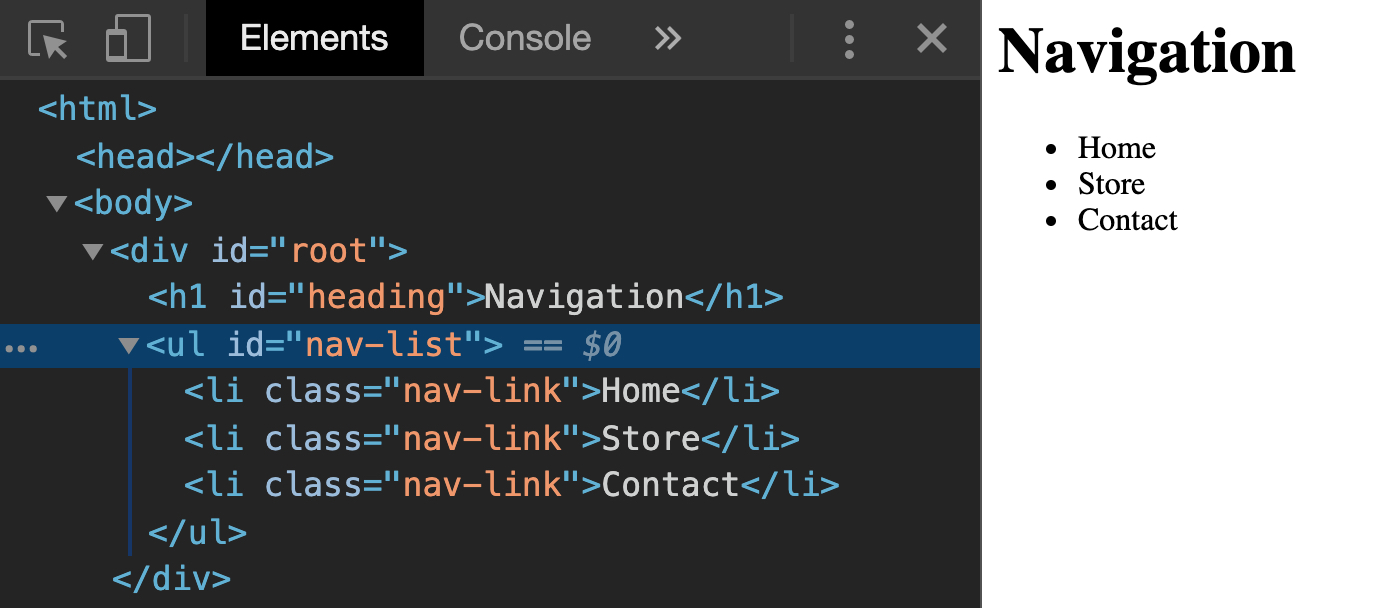
Here is the body of a simple HTML document.
<body>
  <h1 id="heading">Navigation</h1>
  <ul id="nav-list">
    <li class="nav-link">Home</li>
    <li class="nav-link">Store</li>
    <li class="nav-link">Contact</li>
  </ul>
</body>
<script>

</script>
2
3
4
5
6
7
8
9
10
11
Let's add some selectors in our script to access the DOM.
const heading = document.getElementById('heading')
getElementById() method searches the HTML for an id that matches the given string and returns that element. In this case, getElementById() returns the h1 element because getElementById() is looking for the element with the id matching 'heading'.
const listItems = document.getElementsByTagName('li')
getElementsByTagName() returns an array-like object called a HTMLCollection object. In this example, we are selecting all the li elements.
const listItemsByClass = document.querySelectorAll('.nav-link')
querySelectorAll() method returns a NodeList object.
NodeList is similar to an HTMLCollection, though it is possible to iterate over it with forEach(). Any element that matches the specified class 'nav-link' will be added to the NodeList.
Both querySelector() and querySelectorAll() are passed a string that uses a CSS specifier. In the example above we are using the "." to specify we are looking for the class of 'nav-link'.
TIP
NodeList and HTMLCollection are collections of DOM nodes. The difference is that while a NodeList can contain any node type, the HTMLCollection contains only elements.
An element is created from an HTML tag; a node is more general and includes text and whitespace.
# Element Properties
DOM selectors return nodes containing properties and methods that can be used to get information from the DOM.
When the browser loads the page, it parses (that is, it reads) the HTML and generates DOM objects from it. For element nodes, most standard HTML attributes automatically become properties of DOM objects. For more information, see Attributes and Properties
const heading = document.getElementById('heading')
const headingText = heading.innerText
2
In this example, we are accessing information stored in the object's innerText property and assigning it to a variable. In this case, If we were to console.log(headingText), it would output to the console 'Navigation'.
Another useful property is length. Just like any string or array we can access the length of a returned object.
const listItemsByClass = document.querySelectorAll('.nav-link')
const listItemsLength = listItemsByClass.length
2
In this case our returned object is a NodeList. Since it contains our 3 elements, it's length will come out to be 3.
# Changing the DOM with JavaScript
Not only can we select and access the information of nodes in the DOM, we can also update the DOM and create new elements.
# Updating the DOM
Using the HTML of the example above let's change our heading to a different string using JavaScript.
<body>
  <h1 id="heading">Navigation</h1>
  <ul id="nav-list">
    <li class="nav-link">Home</li>
    <li class="nav-link">Store</li>
    <li class="nav-link">Contact</li>
  </ul>
</body>
<script>

</script>
2
3
4
5
6
7
8
9
10
11
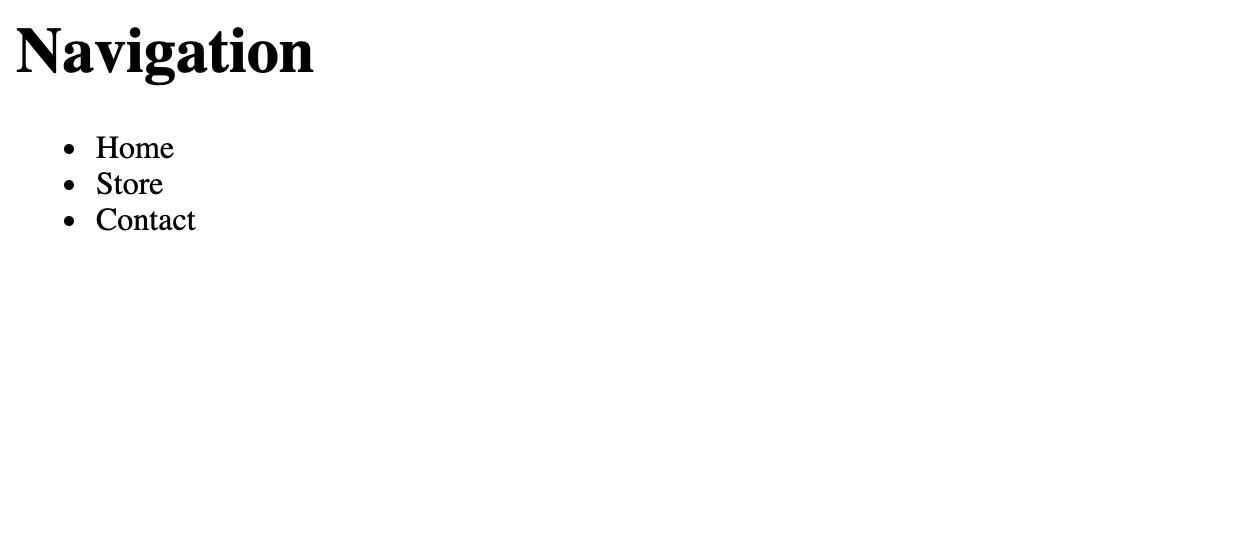
This markup is displayed in the browser as:
Assigning document.querySelector('#heading') to a variable will allow us to access the innerText property of the element. We can then reassigned the value of the innerText property.
const heading = document.querySelector('#heading')
heading.innerText = 'Links'
2
If reload our webpage now, it will look something like this:
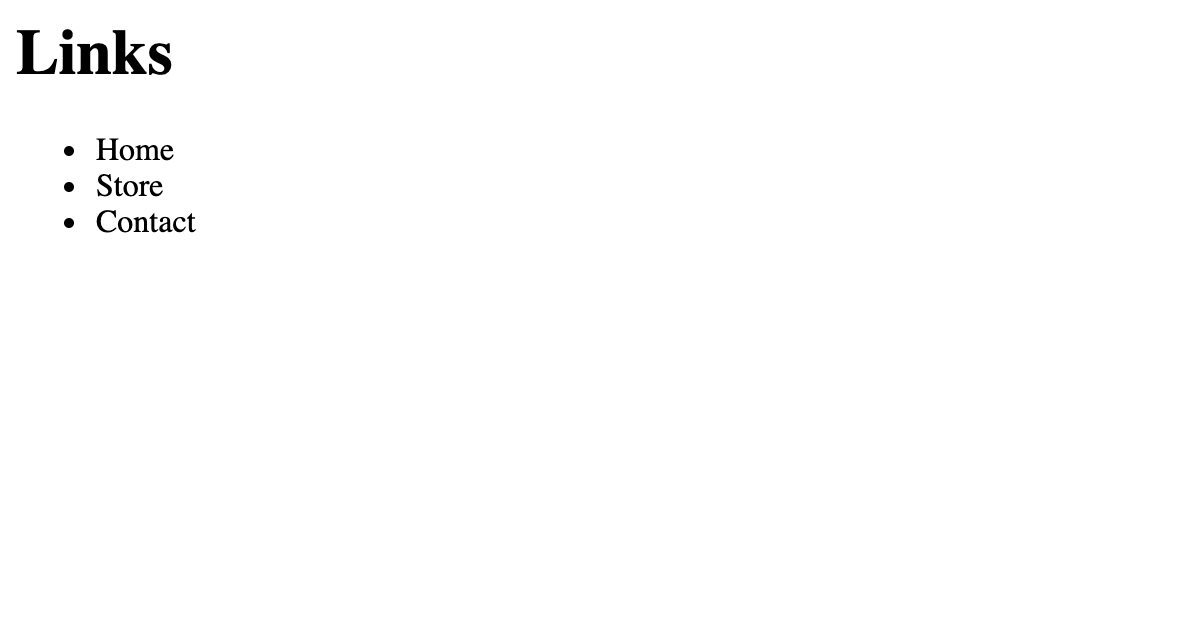
The DOM has been updated and even though we haven't changed anything in the HTML. It is now showing 'Links' instead of 'Navigation'.
We can also change the style of an element. On the next line in our script, let's change the style property of our h1 element.
const heading = document.querySelector('#heading')
heading.innerText = "Links"
heading.style.color = "rgb(255, 0,0)"
2
3
Here we access the style property which lets us add inline styling to an element. We then only have to reassign the color property.

In the dev tools we can see that the h1 element gained a style attribute. It is set to the value 'rga(255,0,0)' which is what we assignedto the style.color property.
# Creating Elements
The DOM can also create new elements and place them in the DOM. Let's recreate our simple navigation list but with JavaScript only.
For creating the different elements we can use the createElement() method. Lets go ahead and make one for each of the elements we need to complete our bar.
<script>
const headerElement = document.createElement('h1')
const listElement = document.createElement('ul')

const listItemOne = document.createElement('li')
const listItemTwo = document.createElement('li')
const listItemThree = document.createElement('li')
</script>
2
3
4
5
6
7
8
createElement() method creates the HTML element specified by tagName. Here we've created elements for h1, ul and three lis. Now that we have created them let's put them in our document. First we will create a div in our HTML with an id of 'root'.
<body>
  <div id="root"></div>
</body>
2
3
In our <script>, we can add a selector for the root div. To add the new elements to the DOM we need to use the append() append() inserts a set of node objects or DOMString objects after the last child of the ParentNode.
const headerElement = document.createElement('h1')
const listElement = document.createElement('ul')

const listItemOne = document.createElement('li')
const listItemTwo = document.createElement('li')
const listItemThree = document.createElement('li')

const root = document.querySelector('#root')

root.append(headerElement)
root.append(listElement)
2
3
4
5
6
7
8
9
10
11
Using the append() method on our ParentNode (<div id="root"></div>) we can then add our headerElement and listElement to the DOM by appending it to root.
You can also append() to elements that you created with JavaScript. The following example appends items to our list.
<script>
// other code

const root = document.querySelector('#root')

root.append(headerElement)
root.append(listElement)

listElement.append(listItemOne, listItemTwo, listItemThree)

</script>
2
3
4
5
6
7
8
9
10
11
.append() can be used to append multiple elements at once. Here we are appending our three created li elements into the same list.
Let's now use the innerText property and add some text to our headerElement and list items.
// other code
headerElement.innerText = "Navigation"
listItemOne.innerText = "Home"
listItemTwo.innerText = "Store"
listItemThree.innerText = "Contact"
2
3
4
5
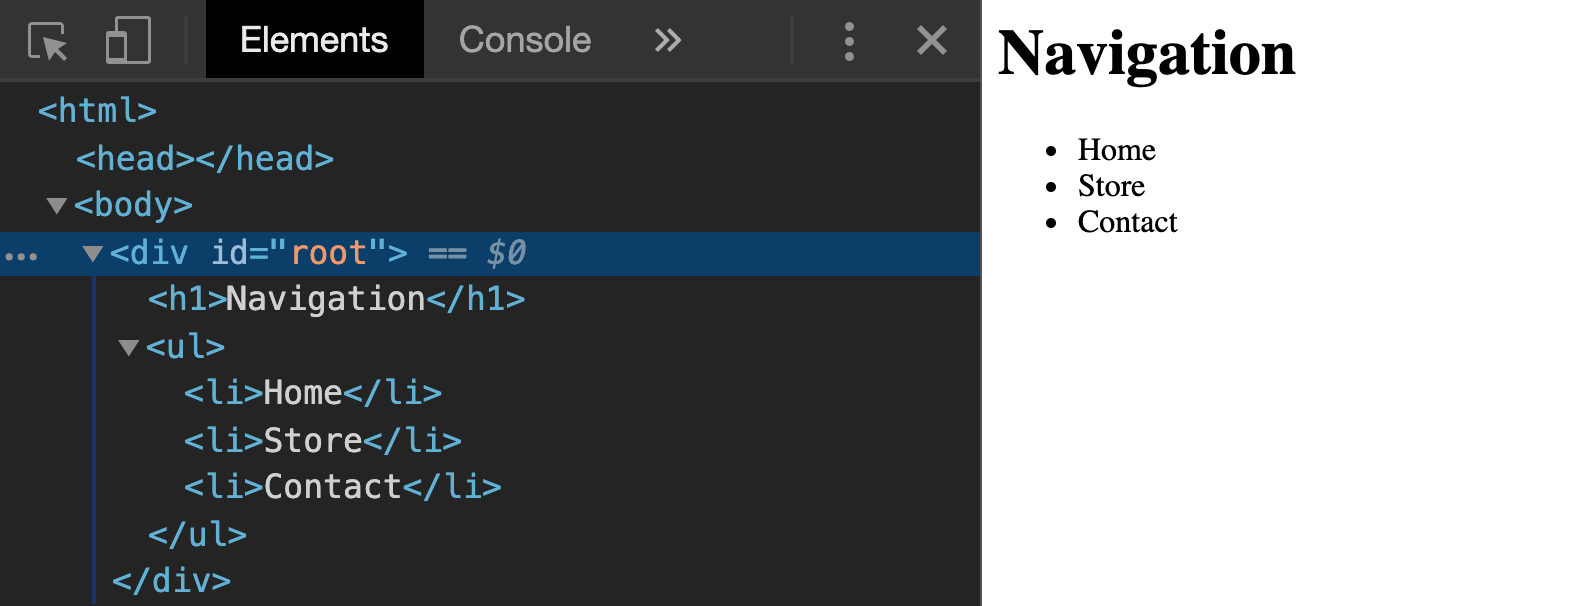
Open the browser we can see our created elements and the text that we have assigned.
# Adding Attributes
To complete our example, we will add id and class attributes to our elements.
We set the id property of our Element objects.
// other code
headerElement.id = "heading"
listElement.id = "nav-list"
2
3
We want add the same class to all three li elements. We can do it at the same time using childNodes() method. This method will return a NodeList of all the elements that is a child of an element.
// other code
listElement.childNodes.forEach(item => {
  item.className = "nav-link"
})
2
3
4
Since childNodes() returns a NodeList of our li elements, we can then use the forEach() method to apply the class to each of our li elements at once.
TIP
Since class is a keyword in JavaScript. To access that property, we use className.
In the dev tools we should see that our created elements have the proper class and id attributes.
# Summary
The DOM can be accessed and changed in Javascript through the document object. The document object has methods and properties that can be used to interact with the DOM.
DOM selector methods return Element objects that are present in the DOM.
Using the append() method, you can append an element as a child of a parentNode in the DOM.
# Training Exercises
To solidify your knowledge, here are a set of exercises that will require you to use the techniques you've just learned in the lesson above.
They are organized into small, medium, and large sized problems. The small exercises will be very similar to the examples in the lesson. If you get stuck, refer to the relevant section above. The medium exercises will require you to combine concepts. The lesson may not have a single, specific example for you to reference. The large exercises are more open-ended and may require you to search the web for additional material.
# Small
Use the HTML below for the following exercises, which you will solve with JavaScript.
<body>
  <h1 id="heading"></h1>
  <ul id="list">
    <li id="lettuce" class="green list-item">Lettuce</li>
    <li id="tomato" class="red list-item">Tomato</li>
    <li id="cheese" class="yellow list-item">Cheese</li>
    <li id="burger">Burger</li>
  </ul>
</body>
2
3
4
5
6
7
8
9
# Add a Heading
Select the h1 tag and set "Toppings" as the text of the heading.
# Add Class
Select the list item 'burger'. Add a class of 'list-item'.
# Create and Append
Create a new li element and append it to the list.
# Medium
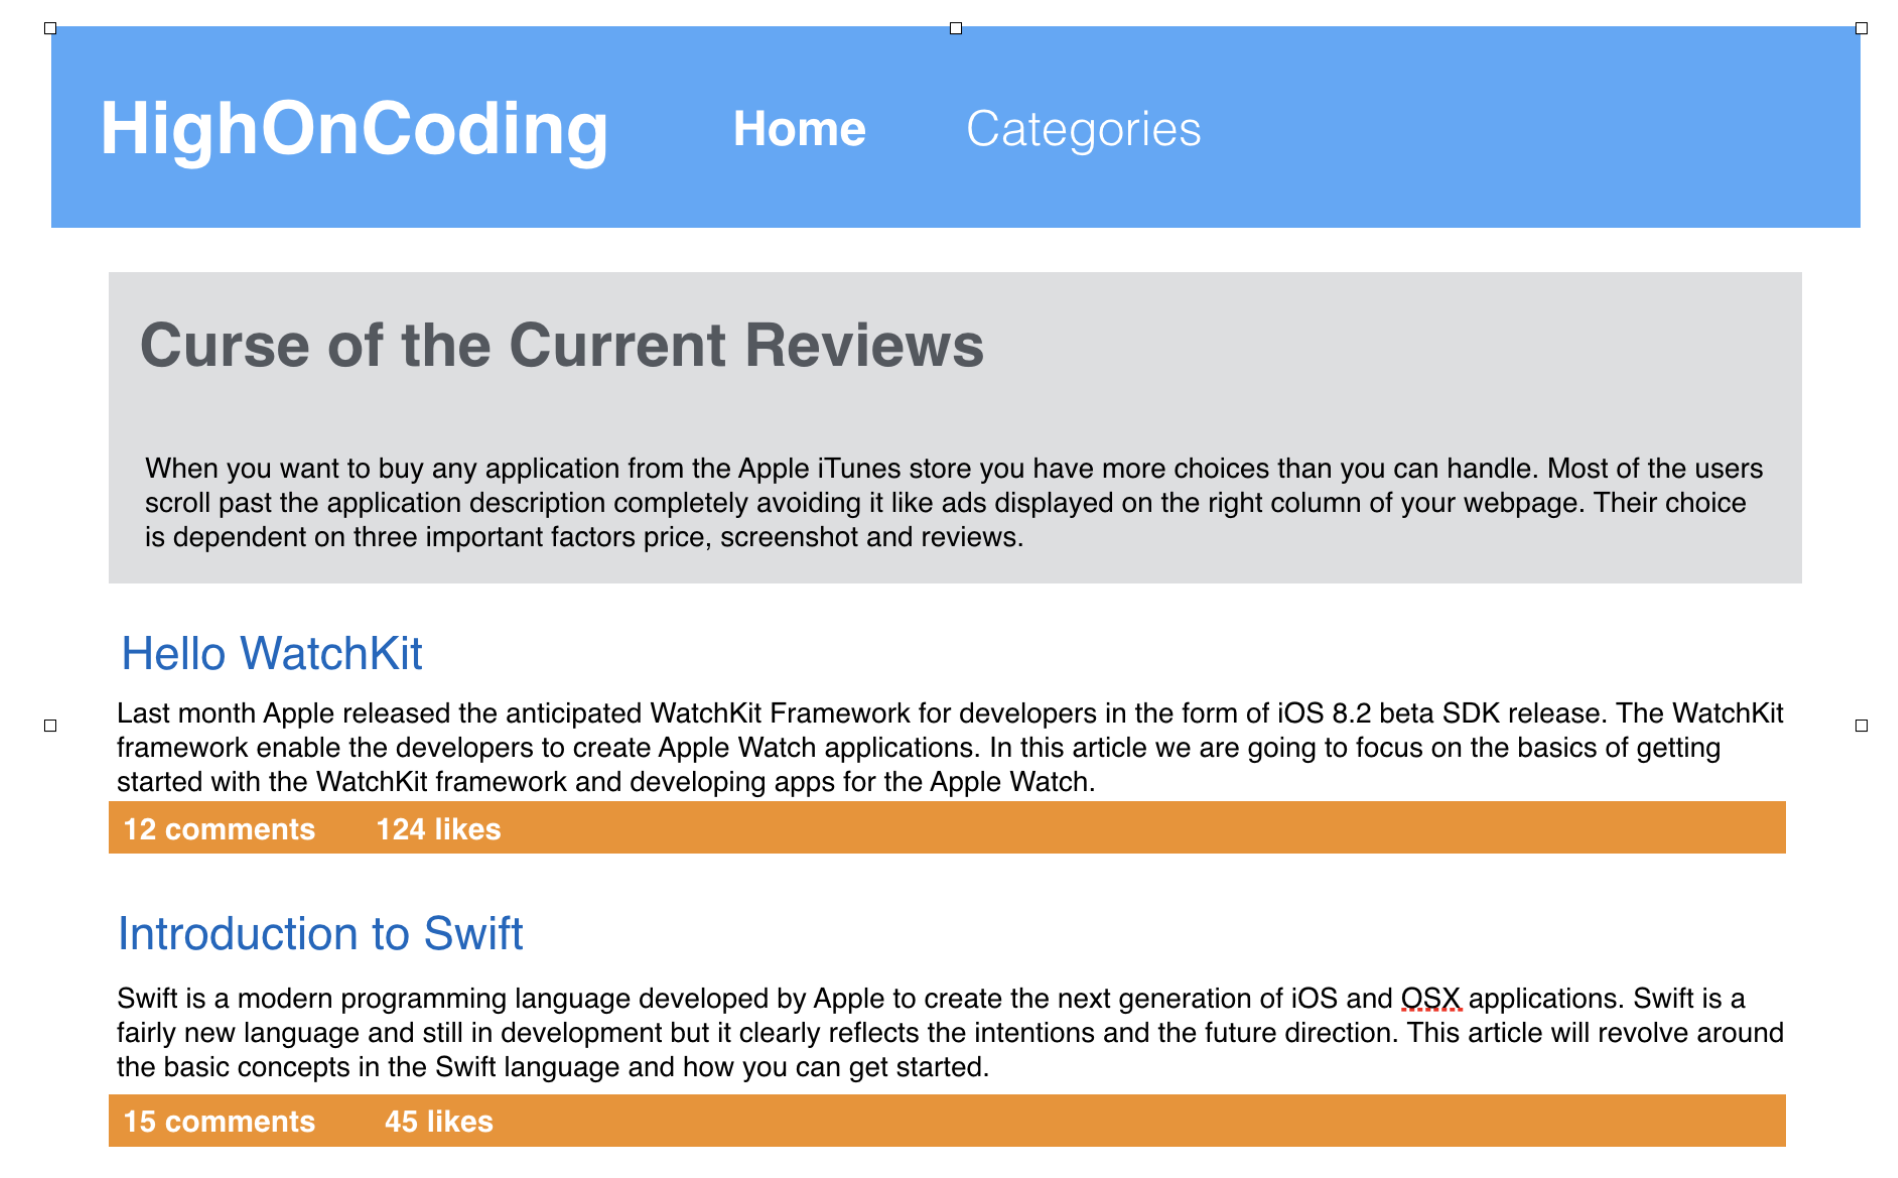
# Dynamic HighOnCoding Webpage
Use JavaScript only to create a complete HighOnCoding webpage as shown below. Your HTML body should only have the following structure:
<html>
  <head></head>
  <body>
    <div id="container"></div>
  </body>
</html>
2
3
4
5
6
Solution
<!DOCTYPE html>
<html lang="en">
  <head>
    <meta charset="UTF-8" />
    <meta name="viewport" content="width=device-width, initial-scale=1.0" />
    <title>High on Coding Blog</title>
    <style>
      * {
        box-sizing: border-box;
      }

      body {
        margin: 0;
        font-family: sans-serif;
        line-height: 1.2;
      }

      h1 {
        margin: 0;
      }

      header {
        display: flex;
        justify-content: space-between;
        align-items: center;
        color: white;
        background-color: #52a6fa;
        padding: 10px;
      }

      header a {
        color: white;
        text-decoration: none;
      }

      header > ul {
        margin: 0;
        list-style-type: none;
      }

      header > ul > li {
        float: left;
        margin-right: 10px;
      }

      main {
        padding: 10px;
      }

      article {
        margin-bottom: 60px;
      }

      .cta {
        background-color: #dddee1;
        padding: 10px 20px;
      }

      .post-headline {
        text-decoration: none;
        color: #0964c0;
      }

      .post-footer {
        display: flex;
        padding: 2px 5px;
        background-color: #f39131;
      }

      .post-footer > div {
        color: white;
        margin-right: 10px;
      }
    </style>
  </head>
  <body>
    <div id="container"></div>
    <script>
      // Build website
      var dummyText =
        "Lorem ipsum dolor, sit amet consectetur adipisicing elit. Nisi modi, deserunt ullam voluptates sapiente unde molestiae ab amet dolor dolore dolores similique consectetur ducimus alias necessitatibus ut temporibus culpa, beatae sunt exercitationem autem dolorum? Ratione itaque fuga architecto pariatur corporis aperiam nesciunt et quas doloribus, nihil officiis quo numquam nemo earum placeat suscipit, repellendus nisi! Veniam nisi facilis totam eius libero possimus quam laudantium laboriosam perferendis saepe dolorem hic nostrum, ad est cumque voluptates aliquam corporis doloremque nemo, nihil temporibus. Maiores, commodi quas consequatur magni, sunt quisquam ullam dolorum tempora distinctio quia architecto minus, laudantium placeat corrupti numquam odit dolorem?";
      buildPage();

      function buildPage() {
        var container = document.getElementById("container");
        container.appendChild(buildHeader());
        container.appendChild(buildContent());
      }

      function buildHeader() {
        var header = document.createElement("header");
        header.appendChild(buildLogo());
        header.appendChild(buildNav());
        return header;
      }

      function buildLogo() {
        var logo = document.createElement("h1");
        logo.textContent = "HighOnCoding";
        return logo;
      }

      function buildNav() {
        var unorderedList = document.createElement("ul");

        ["home", "categories", "about"].forEach(item => {
          var li = document.createElement("li");
          var link = document.createElement("a");
          link.setAttribute("href", "#");
          link.textContent = item;
          li.appendChild(link);
          unorderedList.appendChild(li);
        });

        return unorderedList;
      }

      function buildContent() {
        var content = document.createElement("main");
        content.appendChild(buildCta());
        var post1 = buildPost("Hello Watchkit");
        var post2 = buildPost("Intro to Swift");
        content.appendChild(post1);
        content.appendChild(post2);
        return content;
      }

      function buildCta() {
        var cta = document.createElement("div");
        cta.setAttribute("class", "cta");
        var heading = document.createElement("h2");
        heading.textContent = "Curse of the current reviews";
        cta.appendChild(heading);
        var desc = document.createElement("p");
        desc.textContent = dummyText;
        cta.appendChild(desc);
        return cta;
      }

      function buildPost(headline) {
        var post = document.createElement("article");
        var headline = buildPostHeadline(headline);
        post.appendChild(headline);
        var desc = document.createElement("p");
        desc.textContent = dummyText;
        post.appendChild(desc);
        var footer = buildPostFooter();
        post.appendChild(footer);
        return post;
      }

      function buildPostHeadline(headline) {
        var element = document.createElement("h3");
        var link = document.createElement("a");
        link.setAttribute("href", "#");
        link.setAttribute("class", "post-headline");
        link.textContent = headline;
        element.appendChild(link);
        return element;
      }

      function buildPostFooter() {
        var footer = document.createElement("footer");
        footer.setAttribute("class", "post-footer");

        var comments = document.createElement("div");
        comments.textContent = `${getRandomNumber()} comments`;
        footer.appendChild(comments);

        var likes = document.createElement("div");
        likes.textContent = `${getRandomNumber()} likes`;
        footer.appendChild(likes);
        return footer;
      }

      function getRandomNumber() {
        return Math.floor(Math.random() * 100);
      }
    </script>
  </body>
</html>
2
3
4
5
6
7
8
9
10
11
12
13
14
15
16
17
18
19
20
21
22
23
24
25
26
27
28
29
30
31
32
33
34
35
36
37
38
39
40
41
42
43
44
45
46
47
48
49
50
51
52
53
54
55
56
57
58
59
60
61
62
63
64
65
66
67
68
69
70
71
72
73
74
75
76
77
78
79
80
81
82
83
84
85
86
87
88
89
90
91
92
93
94
95
96
97
98
99
100
101
102
103
104
105
106
107
108
109
110
111
112
113
114
115
116
117
118
119
120
121
122
123
124
125
126
127
128
129
130
131
132
133
134
135
136
137
138
139
140
141
142
143
144
145
146
147
148
149
150
151
152
153
154
155
156
157
158
159
160
161
162
163
164
165
166
167
168
169
170
171
172
173
174
175
176
177
178
179
180
181
# Large
# Create With JavaScript
Using only <div id="root"></div> in the HTML, Create an 'about me' webpage that includes a navbar.
- Only use JavaScript to create page.
- Should be styled using CSS.
- About me should include
- Images
- Description,
- List of likes and dislikes
# Interview Questions
# Fundamentals
- What are the differences between
windowanddocument? - Do
document.onloadandwindow.onloadfire at the same time? - Is an attribute similar to a property?
- What is the fastest way to select elements by using CSS selectors?
- What are the different ways to get an element from the DOM?
- What is the best way to create a DOM element? Should you use
innerHTMLorcreateElement? - How could you make sure to run some JavaScript when DOM is ready like $(document).ready?
# Bugfix
This code throws an error in the console. Explain Why there is an error and how you can fix it.
<html>
  <body>
    <h1>Movie Genres</h1>
      <ul id="genre-list">
        <li class="genre">Action</li>
        <li class="genre">Adventure</li>
        <li class="genre">Comedy</li>
        <li class="genre">Romance</li>
      </ul>
  </body>
  <script>
     const genres = document.getElementsByClassName('genre')

     genres.forEach( genre => {
       genre.style.color = "blue"
     })
  </script>
</html>
2
3
4
5
6
7
8
9
10
11
12
13
14
15
16
17
18
Solution
forEach() is not a function because getElementsByClassName() returns a HTMLCollection object which does not have the method forEach().
Since getElementsByClassName() returns an HTMLCollection object, you would have to convert the it into an array or use a for/of loop.
const genres = document.getElementsByClassName('genre')

for (genre of genres) {
      genre.style.color = "blue";
    }
2
3
4
5
You can also change the selector to querySelectorAll() which returns a NodeList. A NodeList object does have a forEach() method which can be used to iterate through the list and apply the color change.
const genres = document.querySelectorAll('.genre')

     genres.forEach( genre => {
       genre.style.color = "blue"
     })
2
3
4
5
6
# Conceptual
How does the DOM relate to Single Page Applications(SPA)?
# Architect
How would you create DOM elements with data from an API?