# AWS Deployment
# Learning Objectives
After completing this lesson, you will be able to:
- Create an EC2 instance in AWS
- Use SSH key to access AWS remote web server
- Connect GitHub to AWS
- Deploy a static website
- Create an alias
- Obtain a Certbot certificate
# Lesson
# Deploying a Website With AWS
Deploying a site to the web has been simplified by services such as Amazon Web Services, Netlify, and Heroku. Each helps a developer or business easily deploy web applications.
In this lesson we will be exploring how to create your own virtual server and deploy a website using Amazon Web Services and GitHub.
# What is AWS?
Amazon Web Services (AWS) provides a cloud computing platform to individuals, companies, and governments. This includes virtual servers, databases and cloud storage.
Amazon's Elastic Compute Cloud (EC2) is a service for creating and managing virtual servers, also known as an "instances". You can access your server instance remotely using your terminal. We will be installing Ubuntu Linux as the server's Operating System and nginx as the web server software.
# Creating an AWS Account
To use AWS, you will need to register an AWS account. (This is different kind of account from the one you use for shopping.)
Go to aws.amazon.com. Click the 'Create an AWS Account' button on the top right of the screen.
WARNING
Please note a credit card will be needed to set up an AWS account. We will be choosing the free tier option which remains free for a year for up to 750 hours a month. Make sure to set up billing alerts and it will notify you before you have reached your limit and get charged.
You can stop the service at any time.
Complete the series of registartion forms, then verify your account by clicking the link that AWS emails you.
Once your account is verified, log in and you should be redirected to the AWS Management Console.
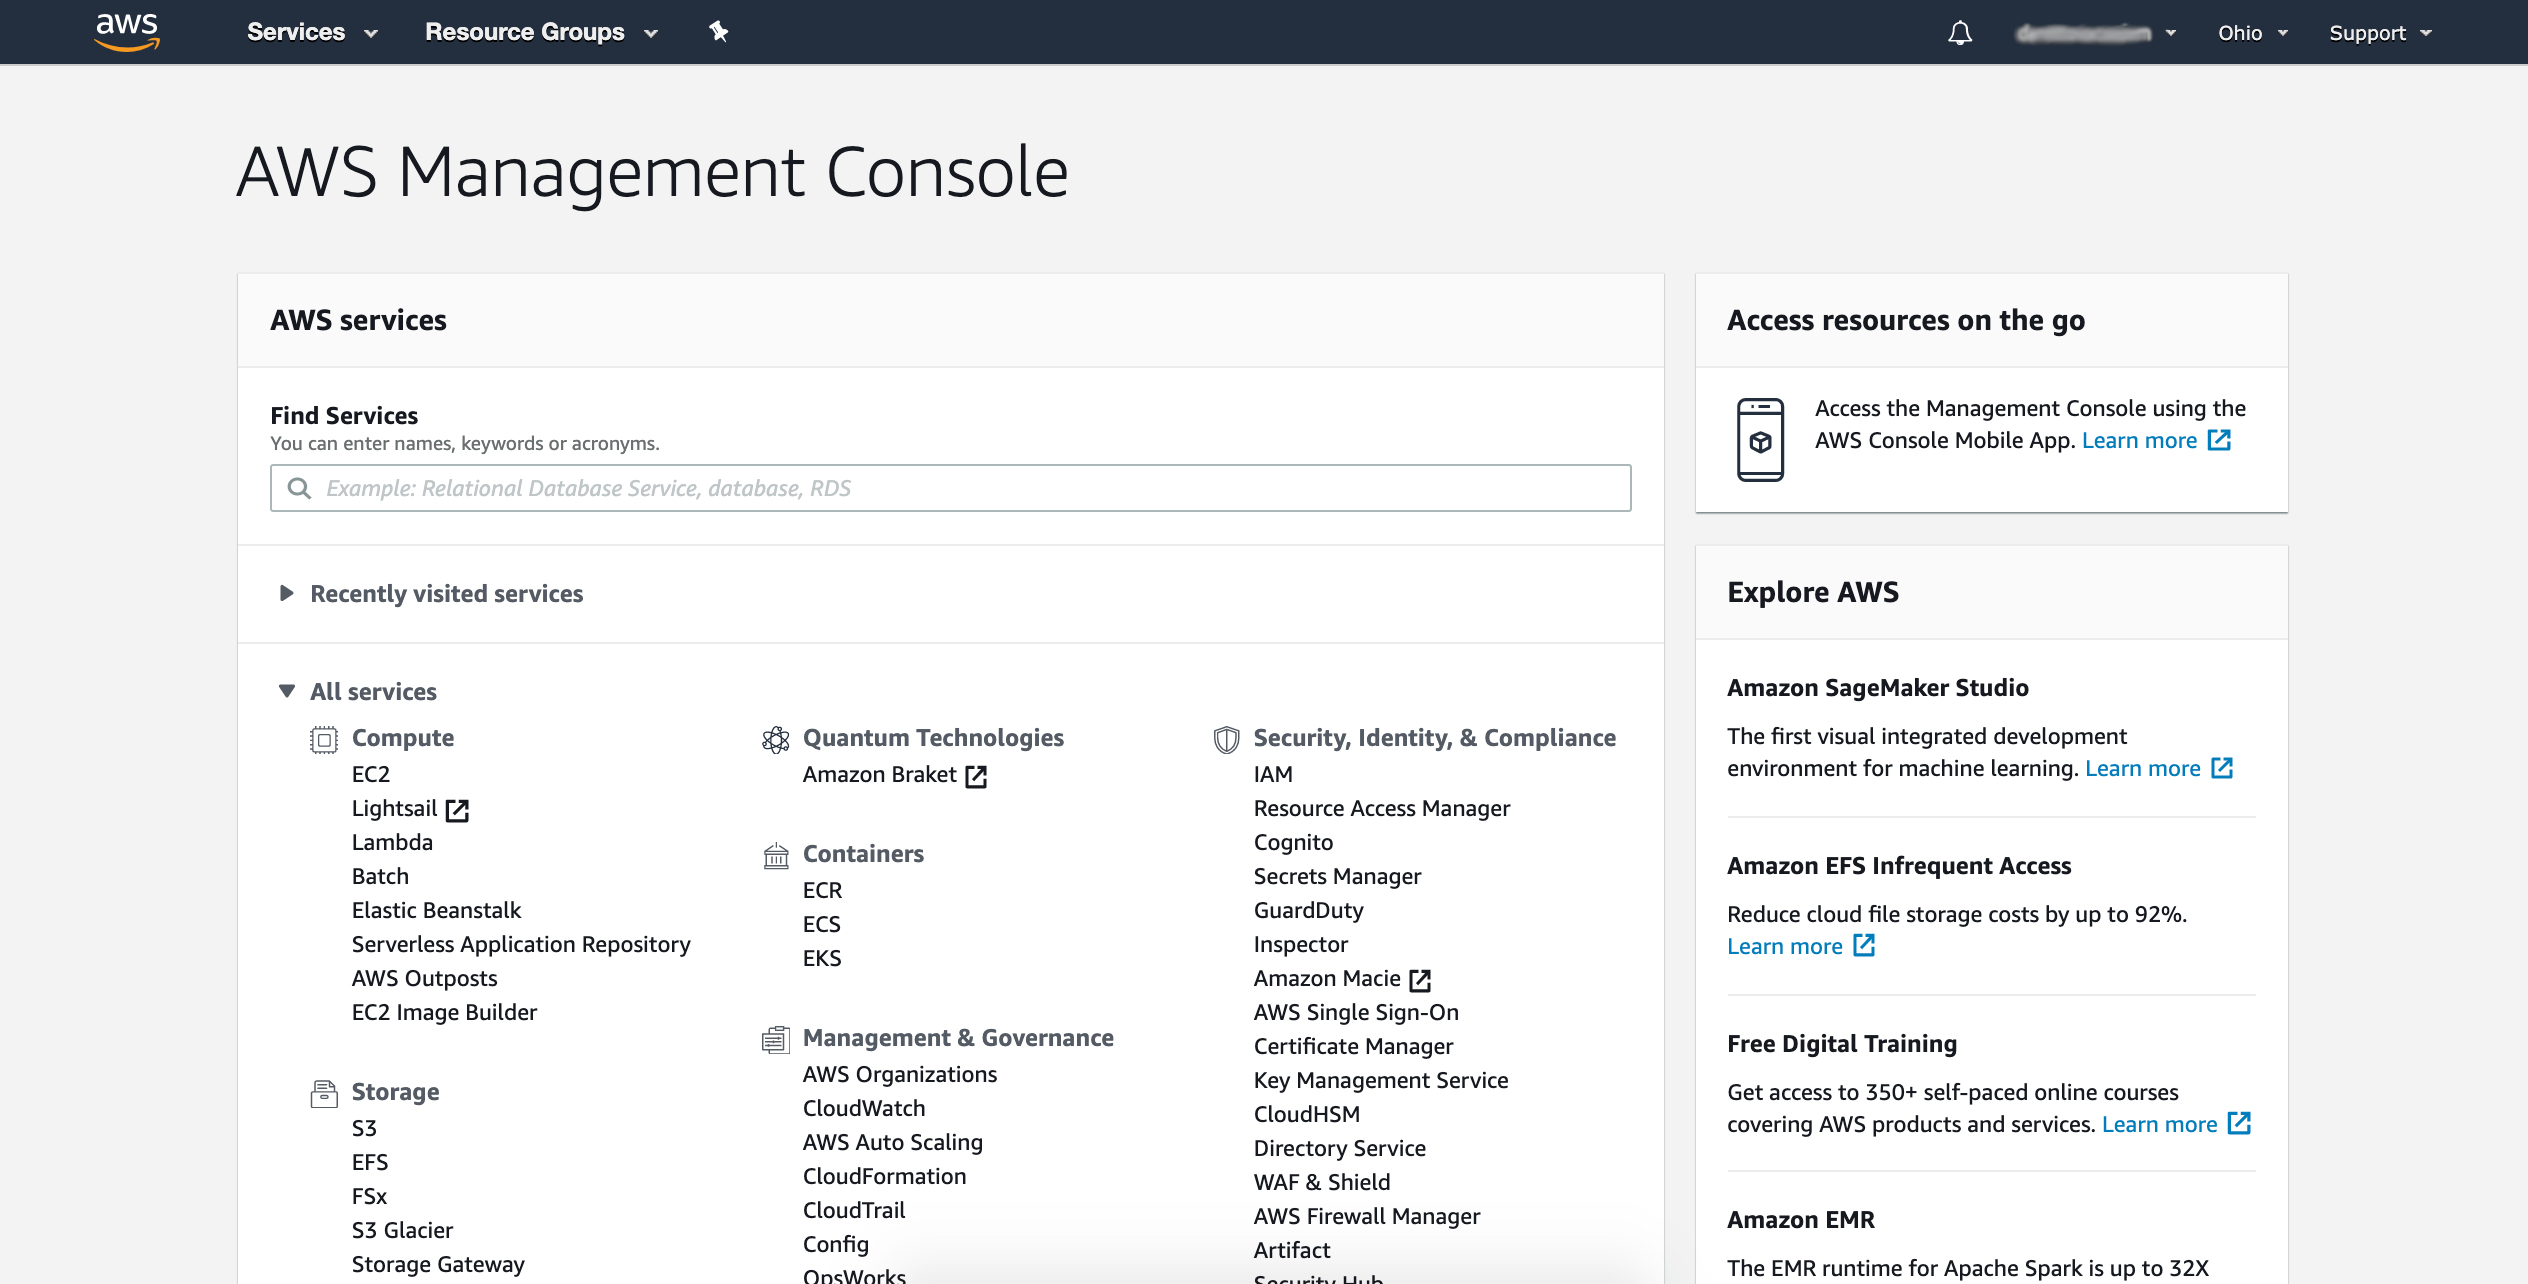
The AWS Management Console allows you to select services that are provided Amazon. On the top of the screen you can set the region for your services. It is important to choose a region close to the physical location that you will be working from.
# Creating an Instance
To use the EC2 service click 'EC2' from the services' list in your AWS Management Console.
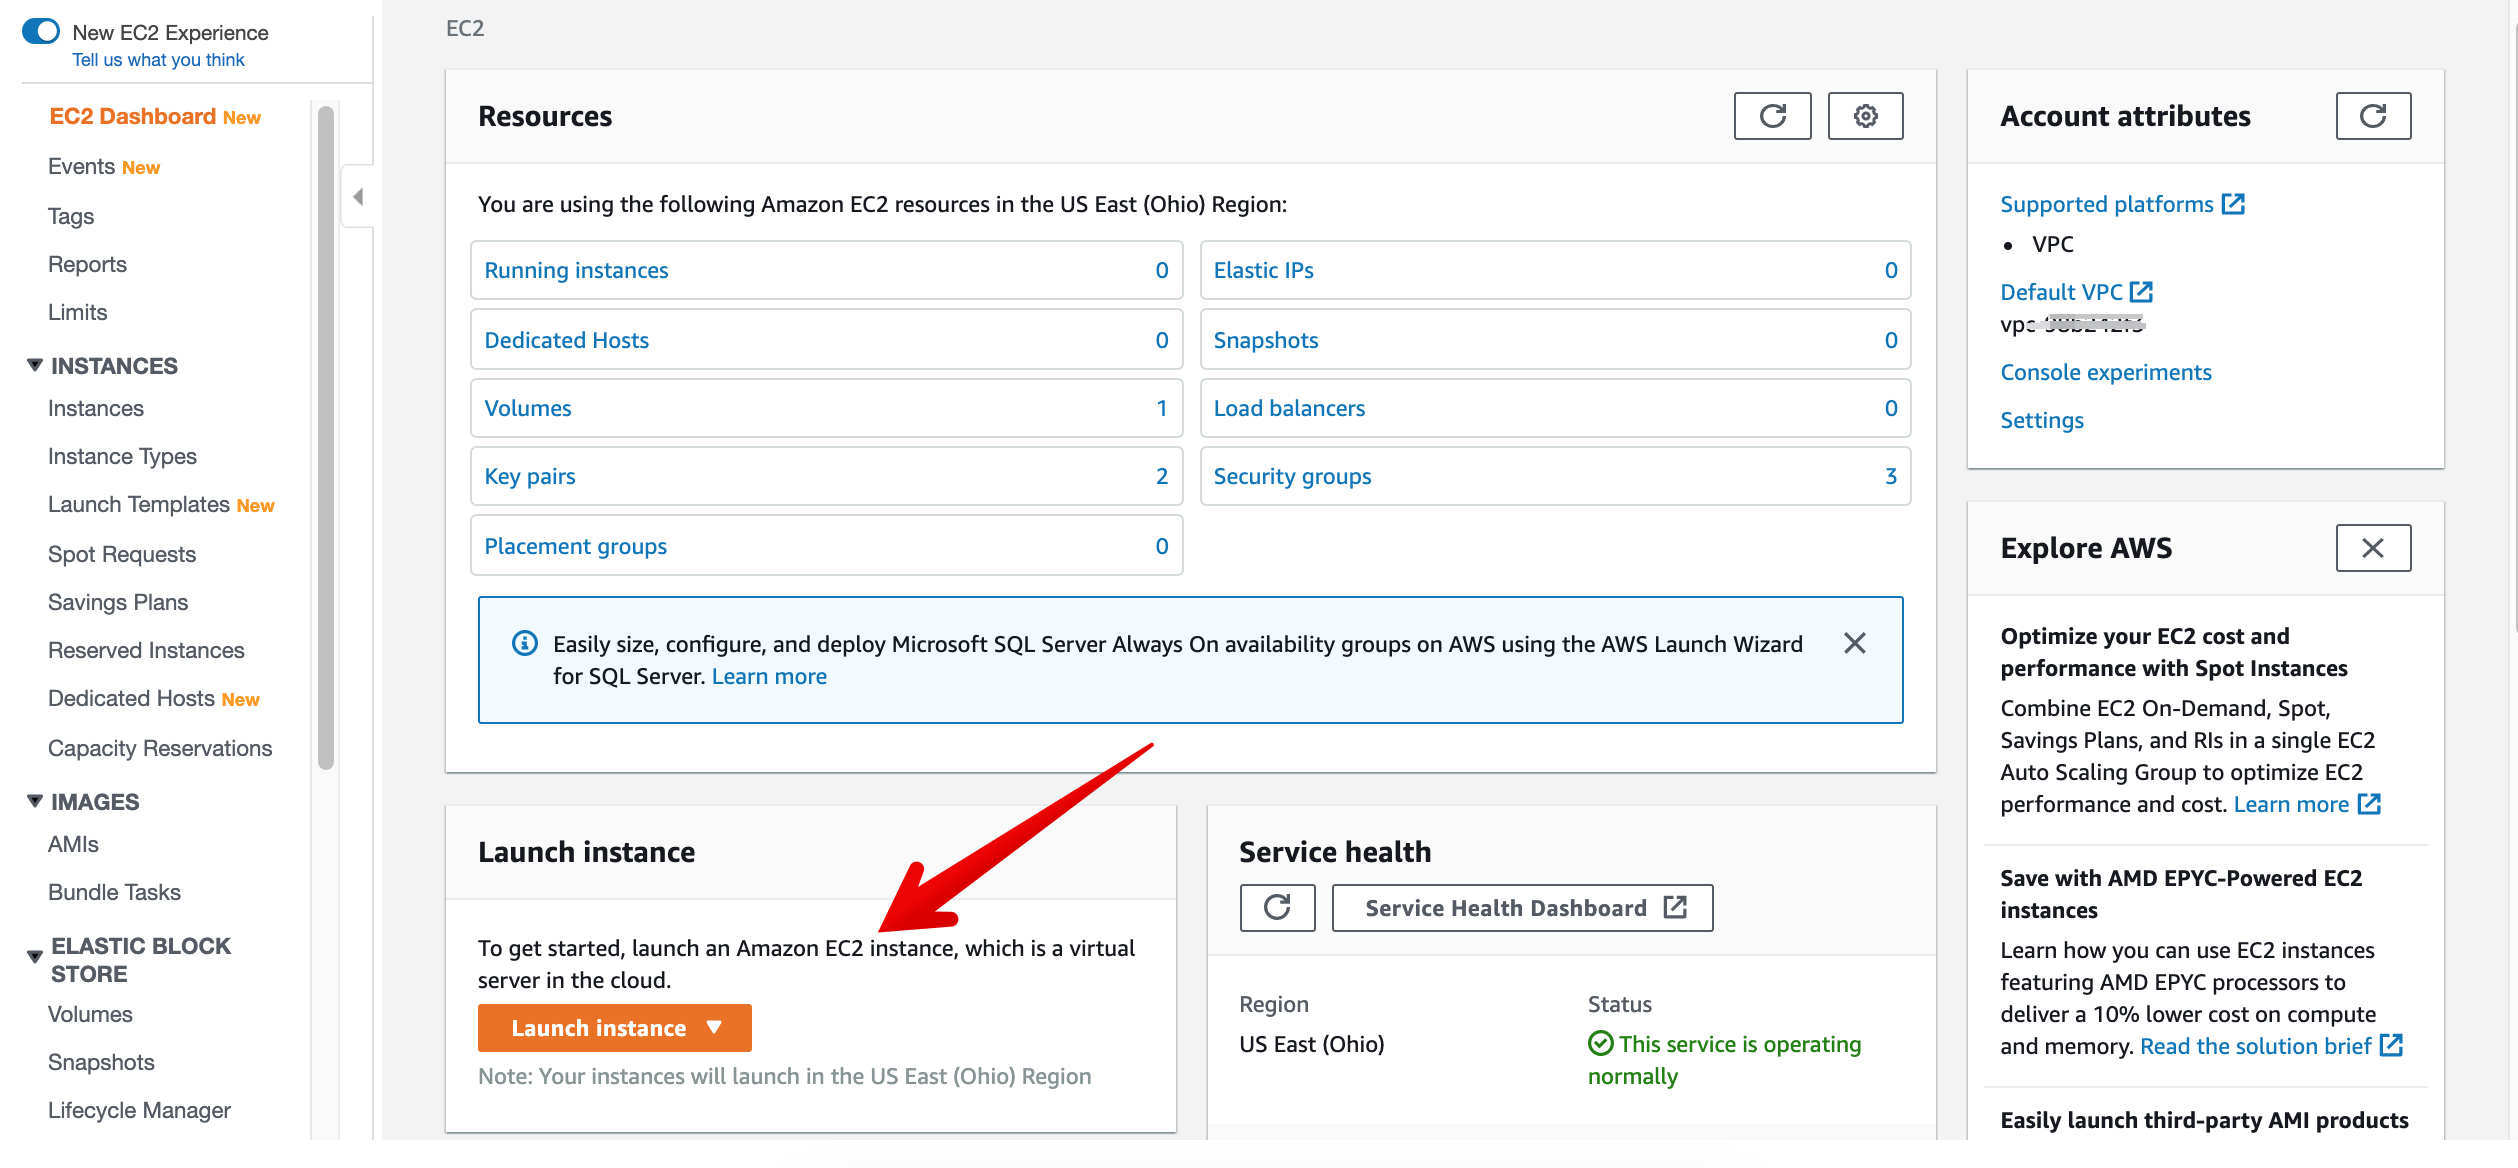
The EC2 Dashboard gives you information on the resources that you are using and the health of the service.
Click on the 'Launch Instance' button at the bottom of the page.
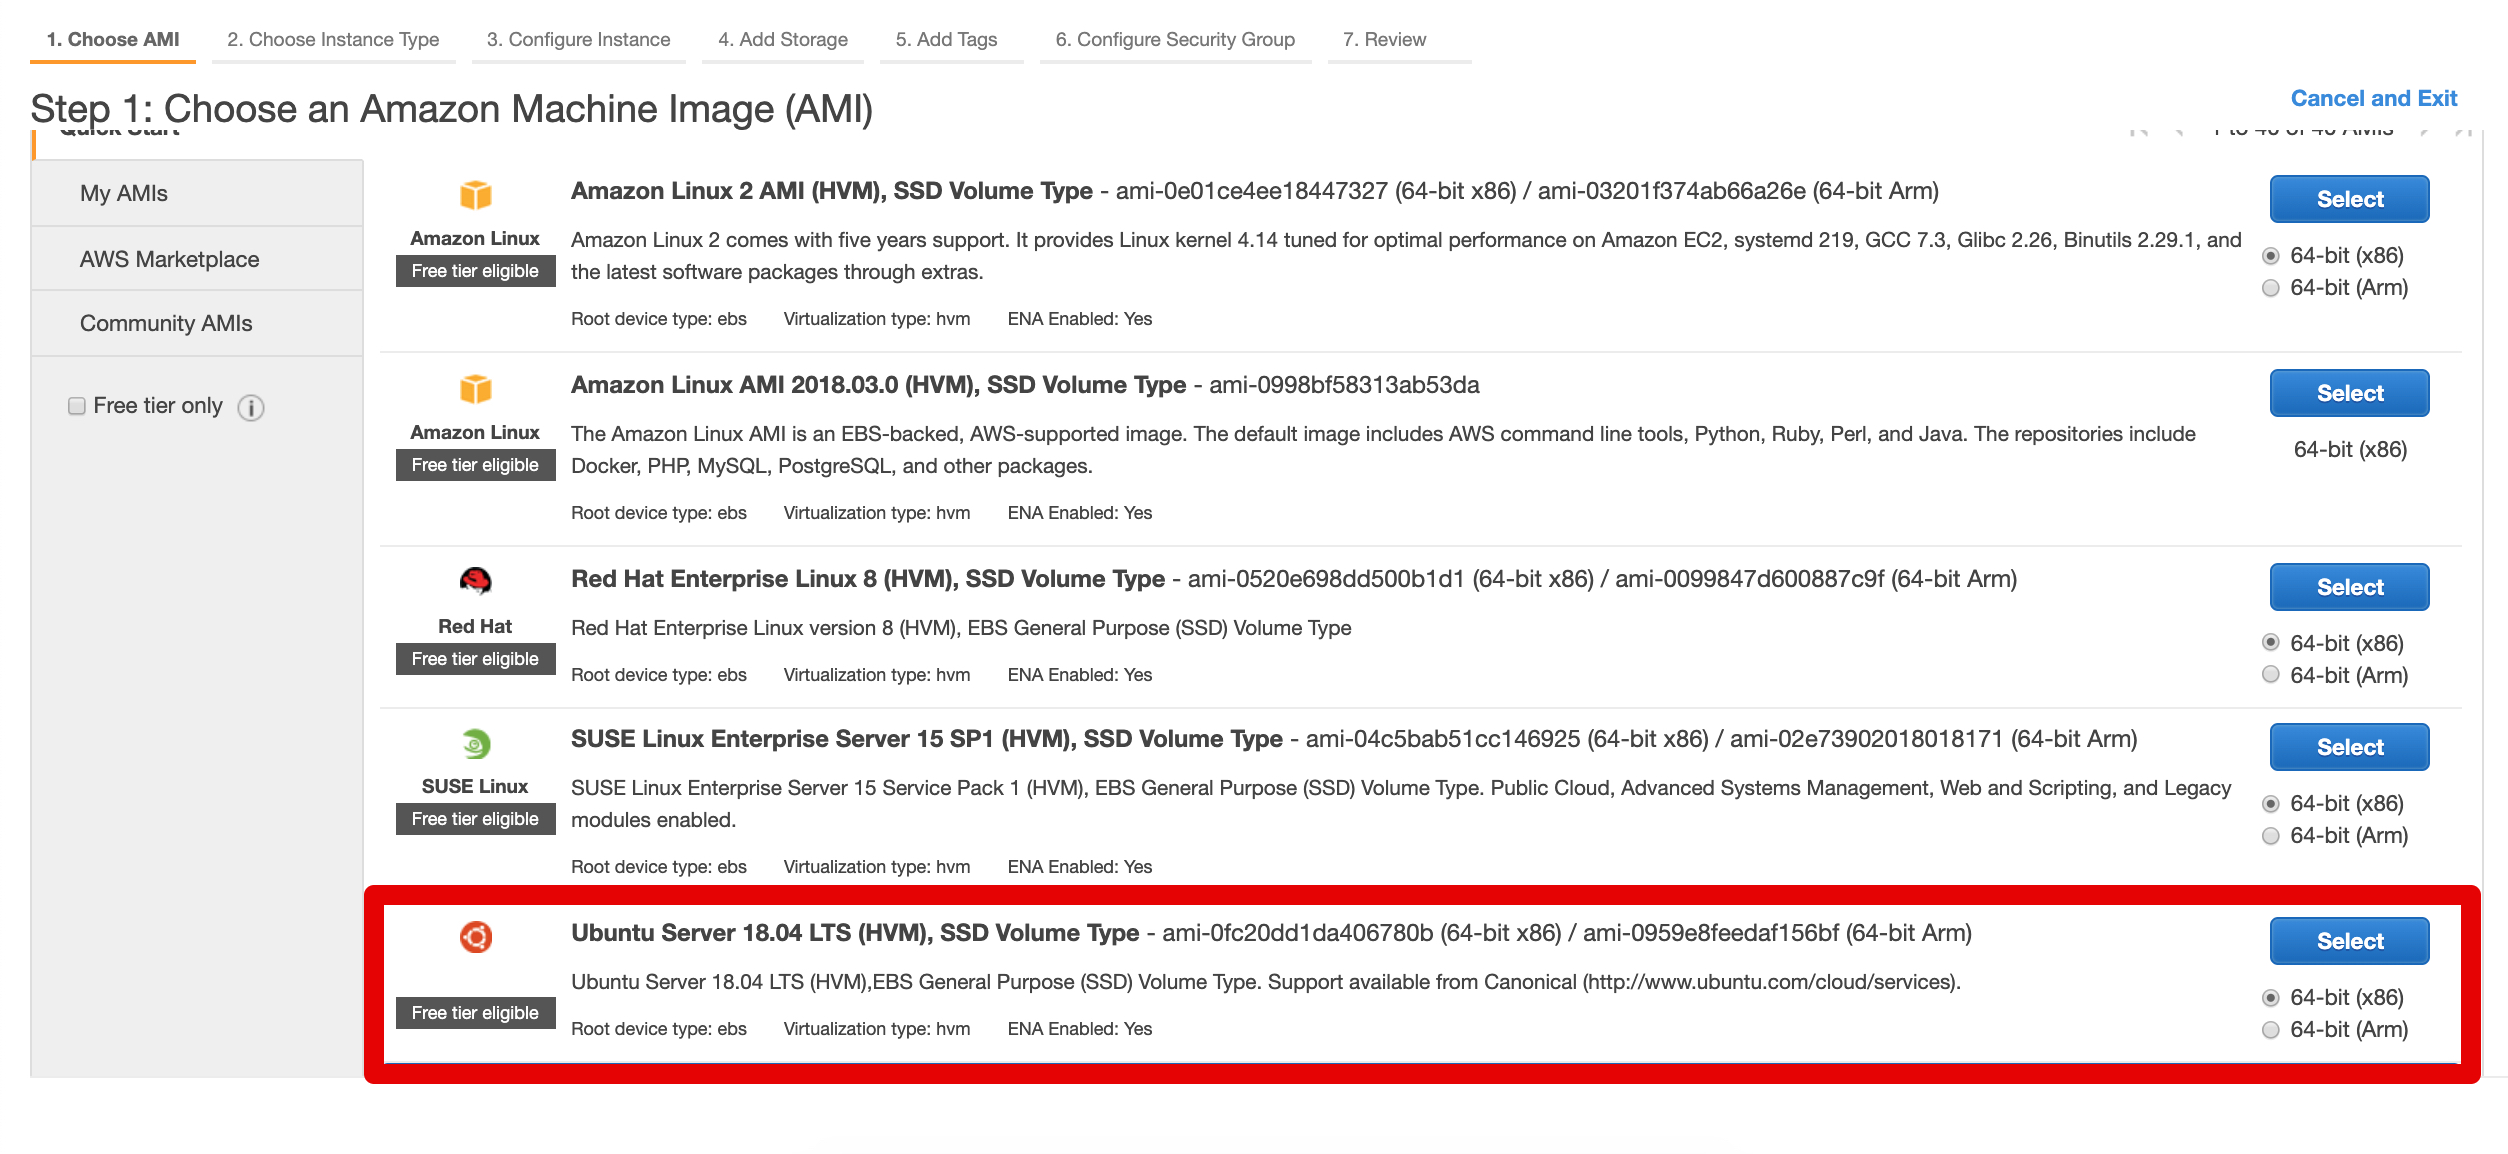
For step 1 in configuring our virtual server, we need to select an Amazon Machine Image or AMI. The AMI that we choose will determine what OS our new instance will run.
Select the 'Ubuntu Server 18.04 LTS (HVM), SSD Volume Type' from the list.
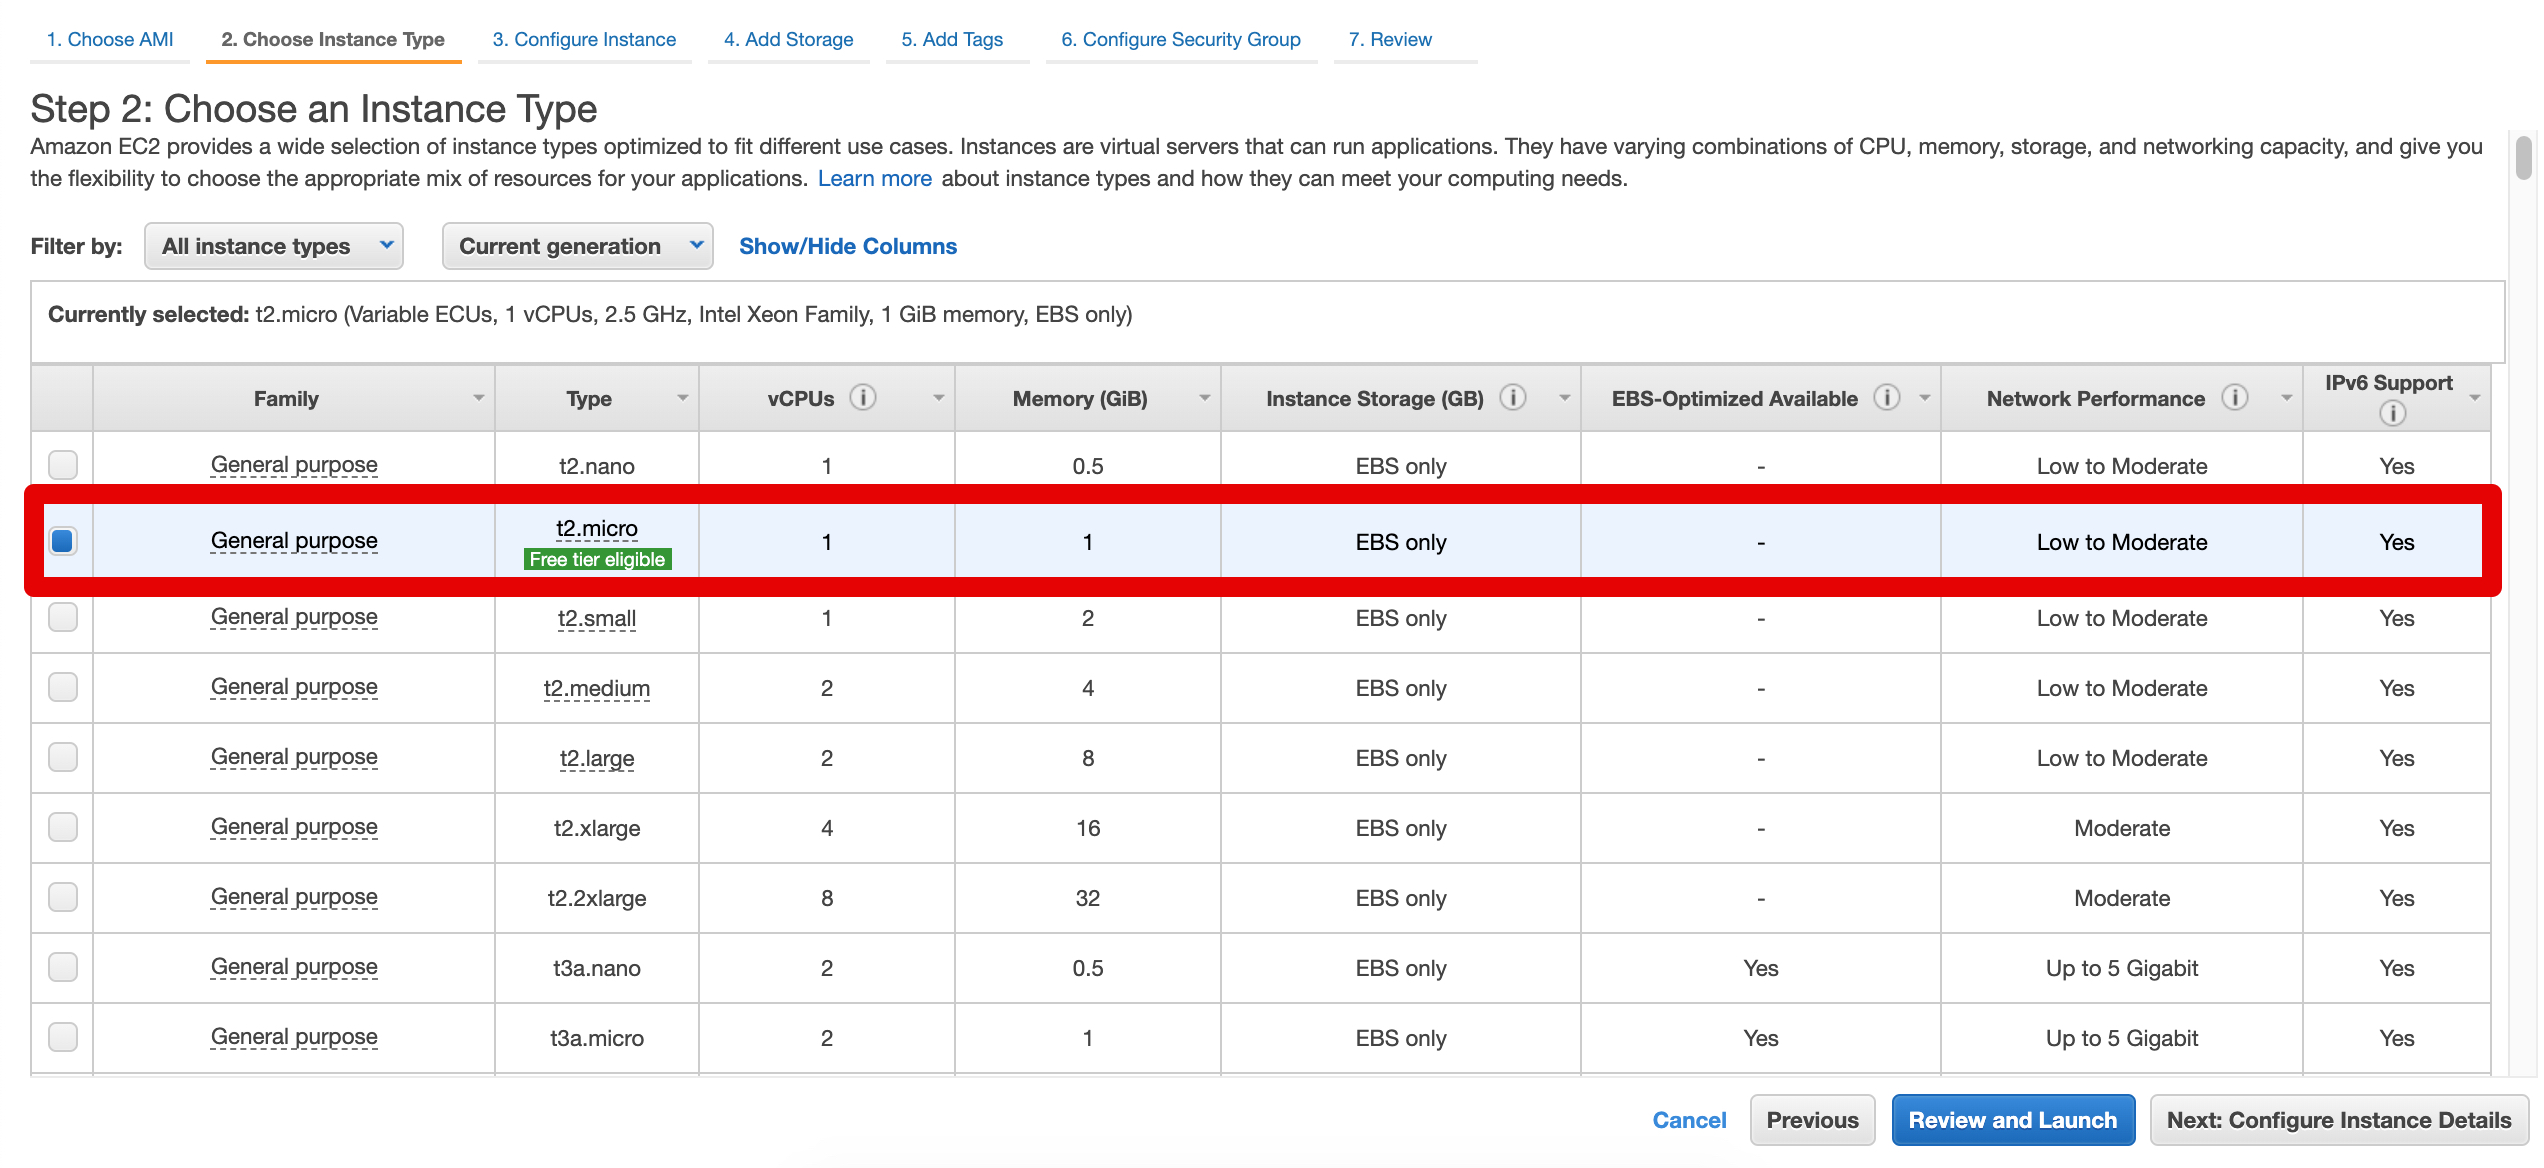
On the next screen we want to select the instance type. In the list, look for the one with 'free tier eligible'.
For the remaining steps, choose the default option. Click 'Review and Launch' button at the bottom of the screen, then click 'Launch' .
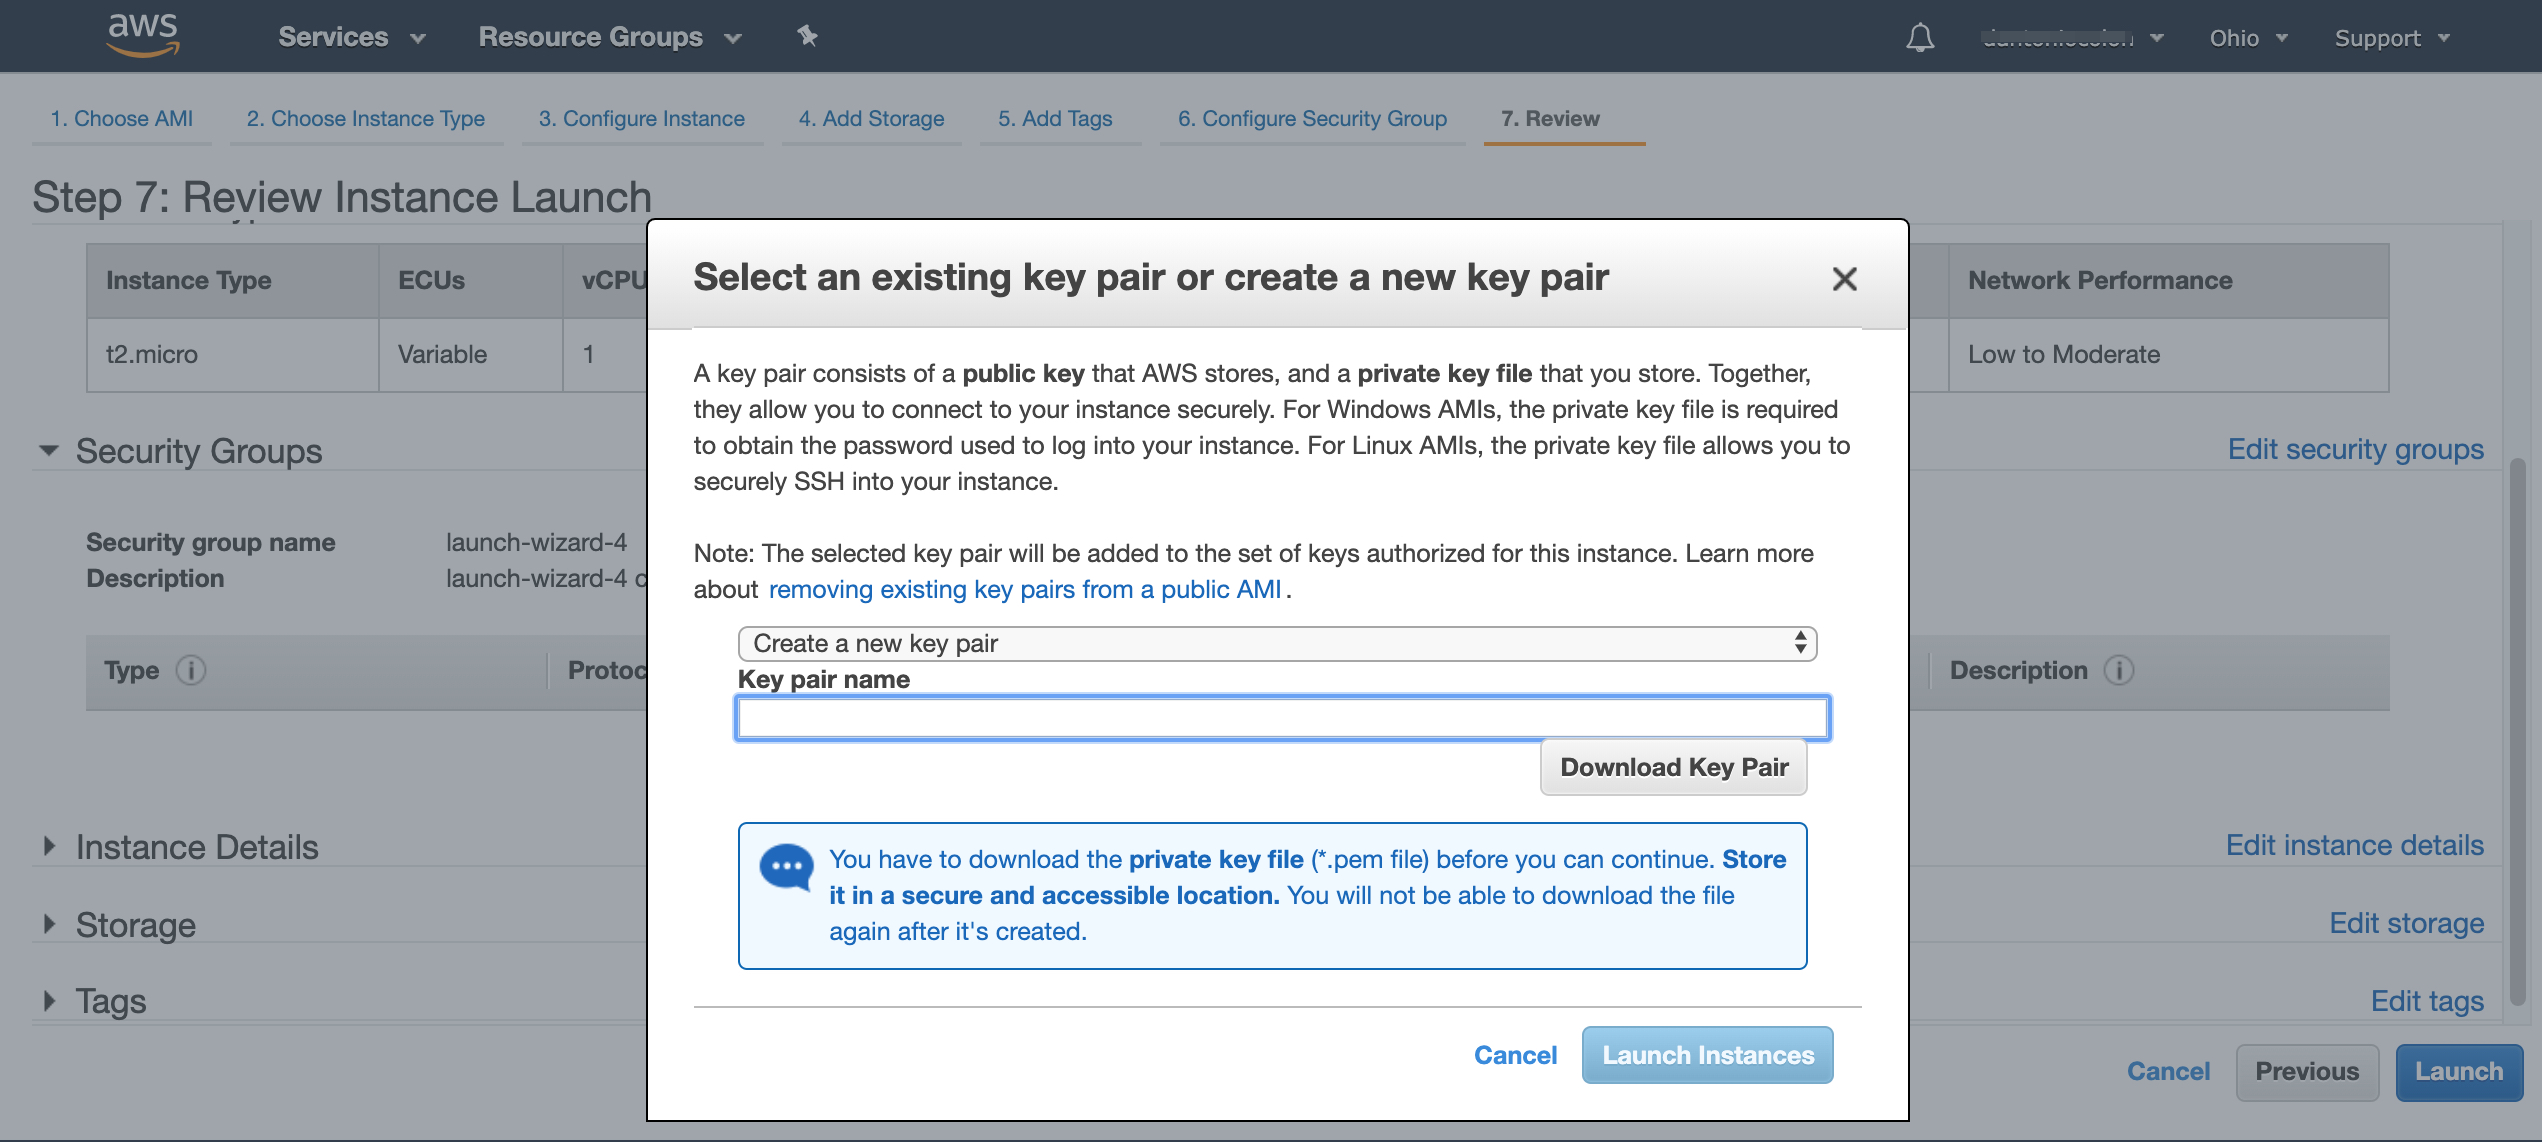
A dialog box will pop up asking you to select an existing SSH key pair or to create a new SSH key pair. Make sure to select 'create a new key pair'.
# Creating the SSH key
SSH keys allow you to access to your EC2 instance without using a password.
Enter a name for the key in the 'Key pair name' field. It should be recognizable to what it is for. e.g., "myEC2Key".
Click 'Download Key Pair' and you'll see a download for `yourKeyName.pem'. Click the 'Launch Instance' button, and your instance will begin configuring and booting up.
While the instance is booting up, you can add your .pem file to the .ssh folder in your home directory.
To check if you have .ssh folder run cd && ls -la. Look for a directory named .ssh. If you don't have it, type the following command in your terminal:
mkdir ~/.ssh
Move the downloaded key into our .ssh folder. To do so, navigate to the location of your downloaded .pem file and then use the mv command to move the key.
mv ~/Downloads/myEC2Key.pem ~/.ssh/
# Connecting to the Instance
Go back to the browser and open the instance management console. Select the instance we just created above and click the 'Connect' button and you will get the following popup:
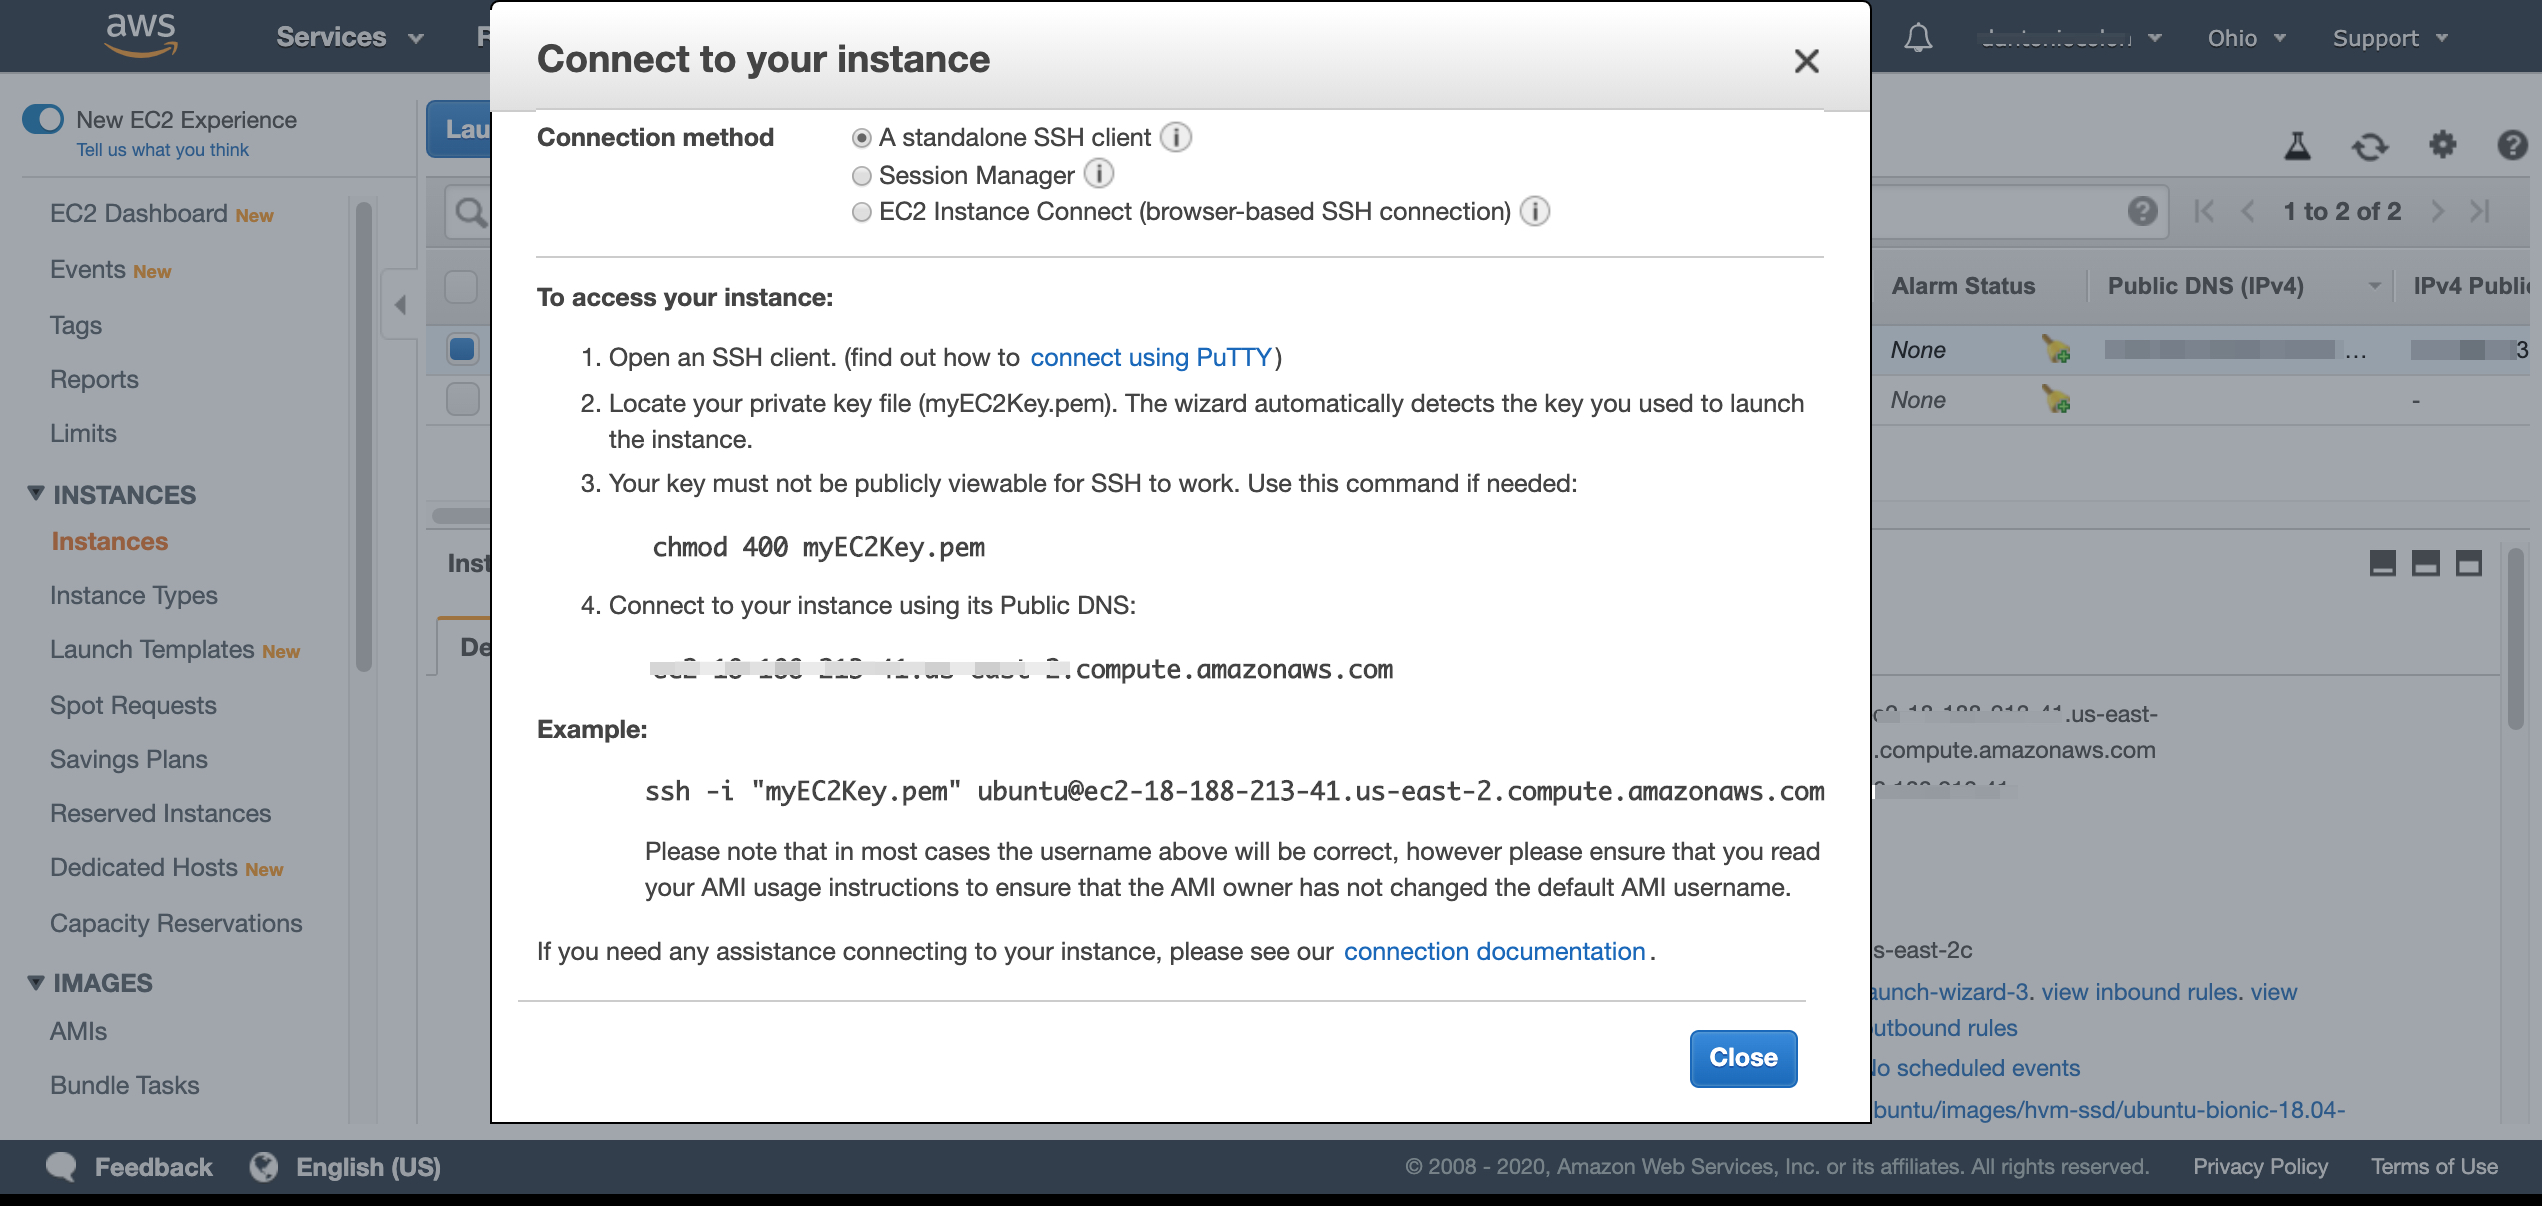
We will follow the instructions for 'A standalone SSH client'.
Navigate to the .ssh directory in your terminal and change the file permissions on your ssh key:
cd ~/.ssh
chmod 400 myEC2key.pem
2
Once you have done this step you can copy the example code in the 'Connect to your instance' popup. Paste this code into your terminal adding in the directory path to your key. ~/.ssh/myEC2Key.pem
ssh -i "~/.ssh/myEC2Key.pem" ubuntu@<YOUR PUBLIC DNS>.us-east-2.compute.amazonaws.com
When you receive a warning, type yes and hit enter. You should see your prompt change in the terminal to something like this.

You are now connected to your remote virtual server. To leave the instance you can type exit and hit enter.
# Adding an Alias
Before we move on let's create an alias for your code to access your EC2. Aliases in your BASH terminal allow you to create shortcuts to running hard-to-type terminal commands, such as the one to connect to your EC2 instance.
You may need to deploy multiple EC2 instances (possibly per project). For this reason, we will give the alias the same name as the (hypothetical) project you are deploying.
(If you are logged in to your EC2 instance type exit to logout and return to your local terminal session.)
For Bash :
# With VSCODE 'code' shortcut enabled
code ~/.bash_profile

# With Nano
nano ~/.bash_profile
2
3
4
5
For Z shell(Zsh):
# With VSCODE 'code' shortcut enabled
code ~/.zshrc

# With Nano
nano ~/.zshrc
2
3
4
5
Add this line at the bottom of the code changing the nameOfProject, <YOUR PUBLIC DNS>, and the name of your key:
alias nameOfProject='ssh -i "~/.ssh/myEC2Key.pem" ubuntu@<YOUR PUBLIC DNS>.us-east-2.compute.amazonaws.com'
Save and close your text editor. Restart your terminal and now type the name you gave the alias.
nameOfProject
You will log into your EC2 without having to type the whole command. Learn more about the alias command here
# Installing and updating EC2 Ubuntu packages
The next steps will take place in the terminal while logged into your instance. Use your alias to connect. Your command prompt should look something like this:
# Updating the system packages
Advanced Packaging Tool (APT) is a command-line package manager for Linux (similar to homebrew for macOS or chocolatey for Windows). APT is the primary way to download and install programs on our Ubuntu Linux instance.
In your EC2 terminal type: sudo apt update && sudo apt upgrade -y
ubuntu@ip-172-31-46-225:~$ sudo apt update && sudo apt upgrade -y
This command will update (see if there are new versions of already installed software) and upgrade (install the new versions) the APT. The -y flag will save you from most of the confirmation boxes that may come up.
This might take a few minutes. As it runs, you may come across this dialog box:
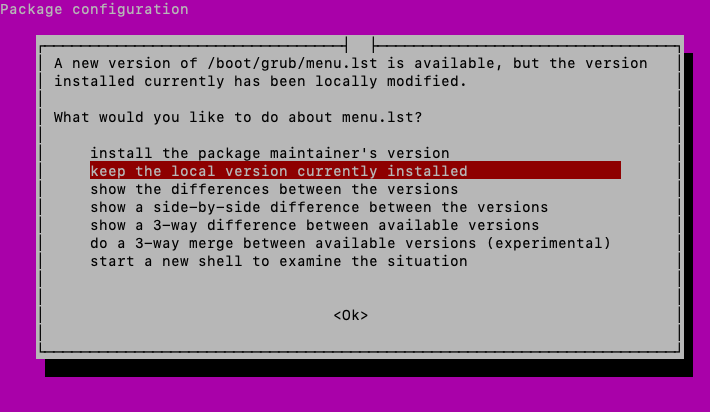
Select the 'keep the local version currently installed' option and press enter.
You will need to reboot the EC2 for all the changes to take effect:
ubuntu@ip-172-31-46-225:~$ sudo reboot
It should automatically close the connection. Wait a few minutes while the virtual server is restarting.
# Installing nginx and Git
Once your EC2 instance restarts, log back in. Once in the EC2 terminal we need to add two more packages before we can deploy your project.
In your EC2 terminal type: sudo apt install nginx git
ubuntu@ip-172-31-46-225:~$ sudo apt install nginx git
With nginx and Git installed, we can now connect with GitHub repositories and deploy our project.
# Connecting to GitHub
# Creating SSH keys for GitHub
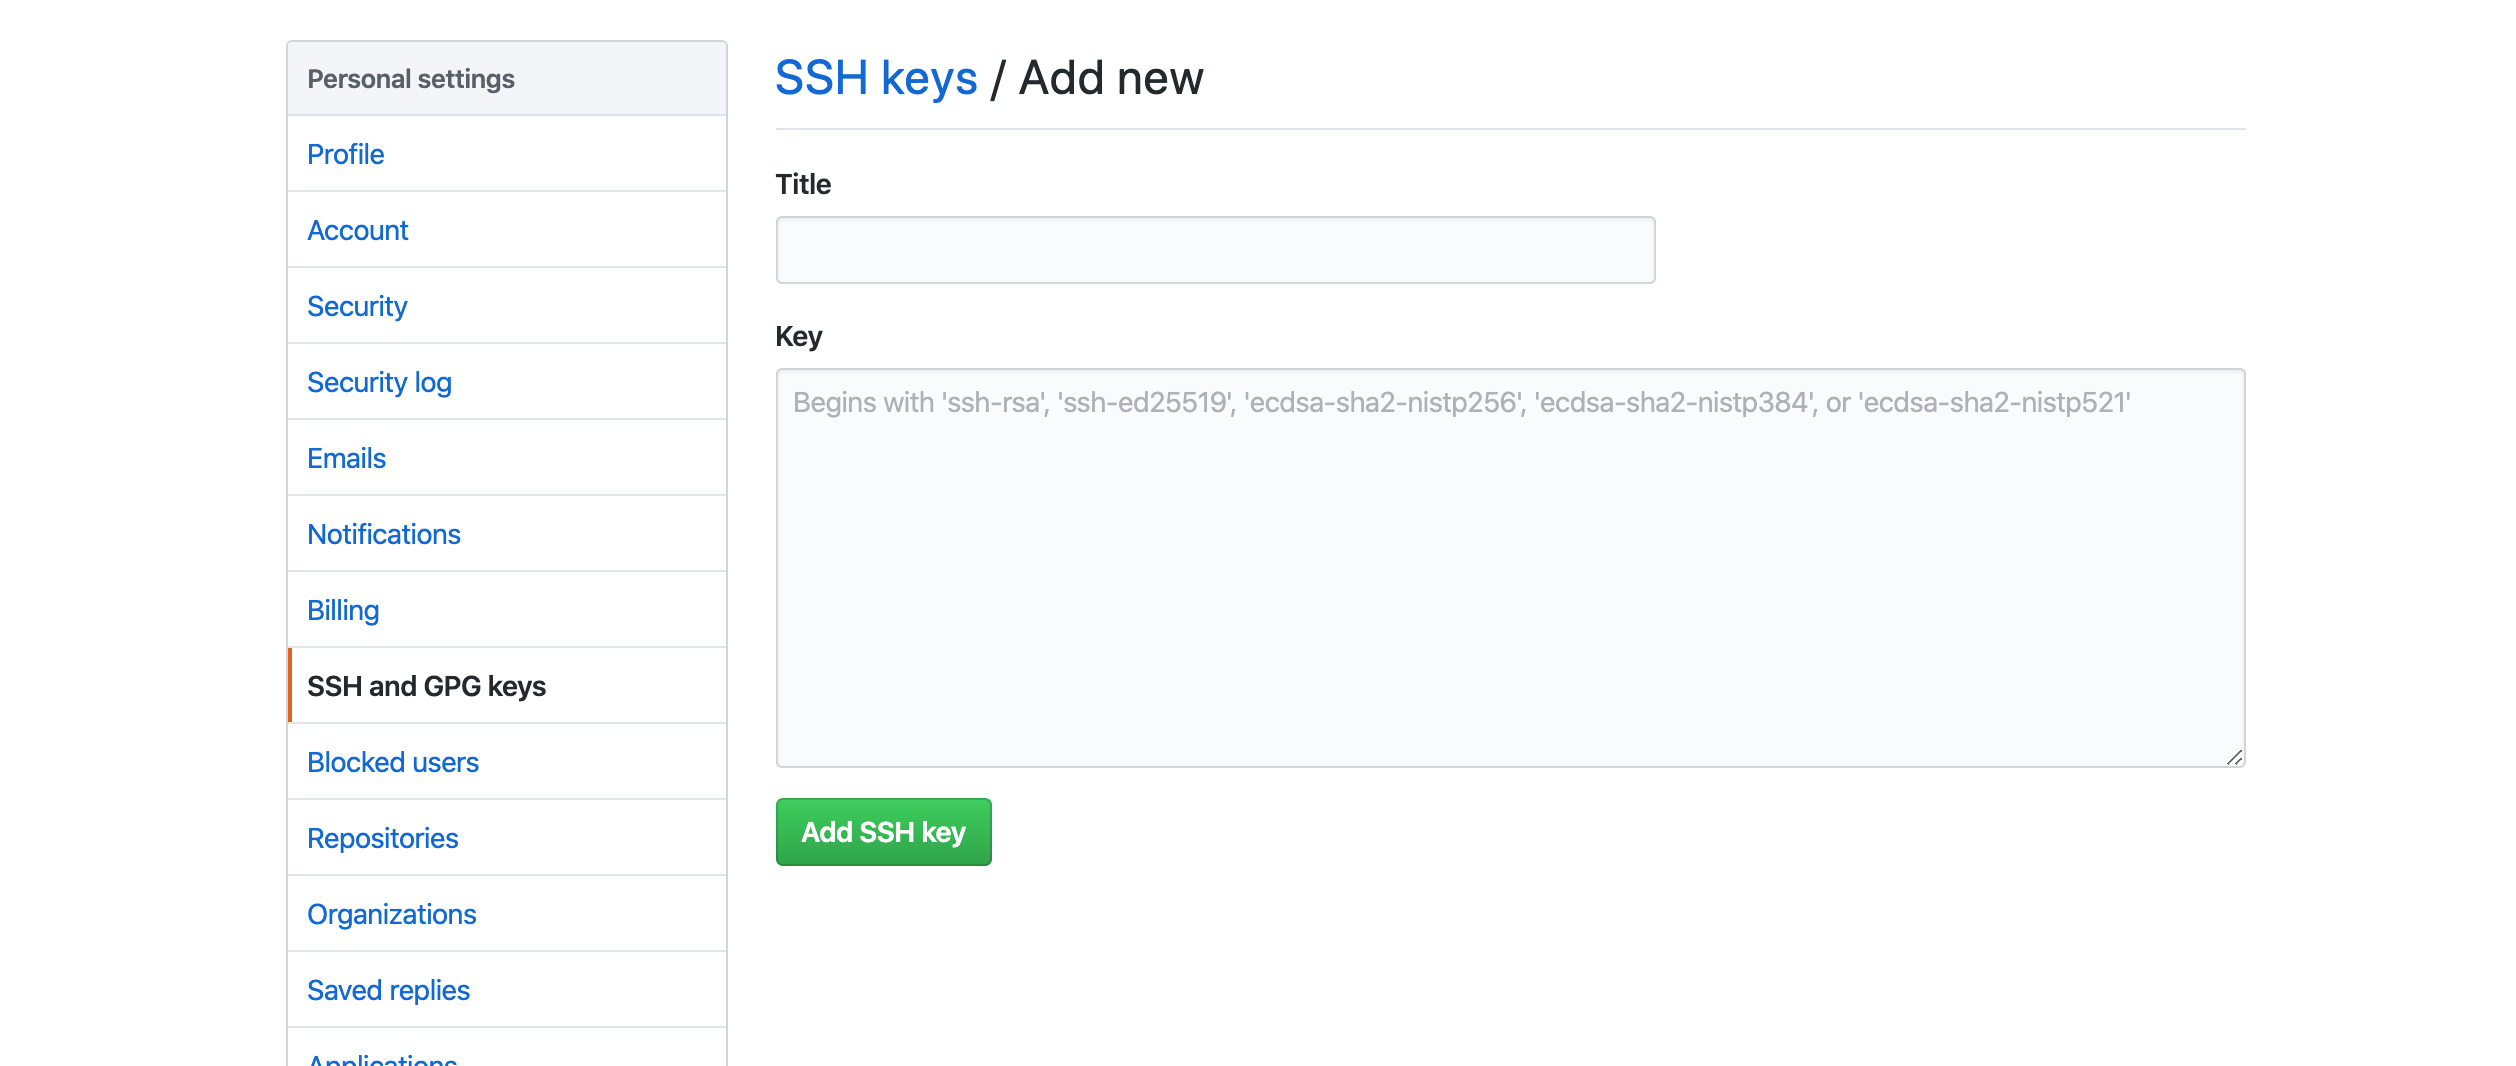
Log into your GitHub account and go to Settings. Select 'SSH and GPG keys" in the left panel. Then click on the 'New SSH key' button.
You should see this screen:
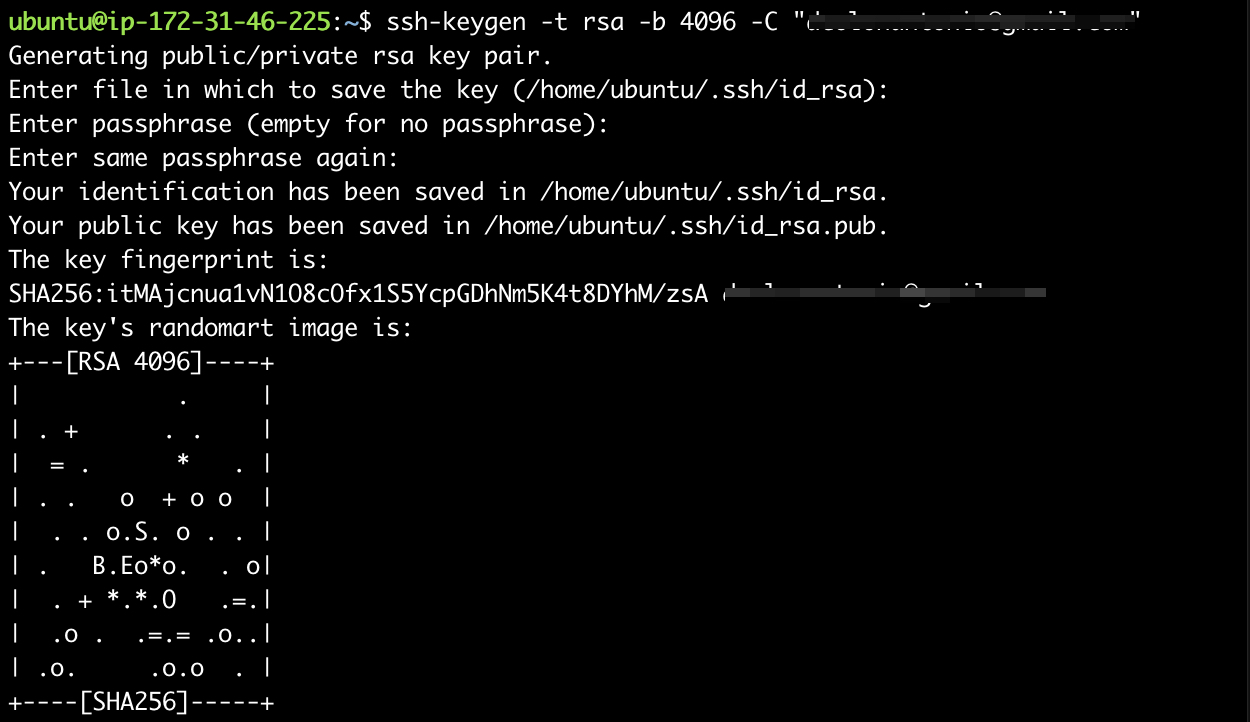
Back in your EC2 terminal, use the following command:
# Use email account associated with your GitHub account.
ubuntu@ip-172-31-46-225:~$ ssh-keygen -t rsa -b 4096 -C "yourEmail@gmail.com"
2
Just press enter through the prompts. It will then create a key.
Now change into your .ssh directory and cat the id_rsa.pub file
ubuntu@ip-172-31-46-225:~$ cd .ssh
ubuntu@ip-172-31-46-225:~/.ssh$ cat id_rsa.pub
2
When you hit enter you, it should print a long string of characters. Copy that string and go back to the GitHub page for adding a new SSH key.
Just as with the AWS ssh key, enter a title that makes it recognizable to what it is for. Paste the copied string into the key field.
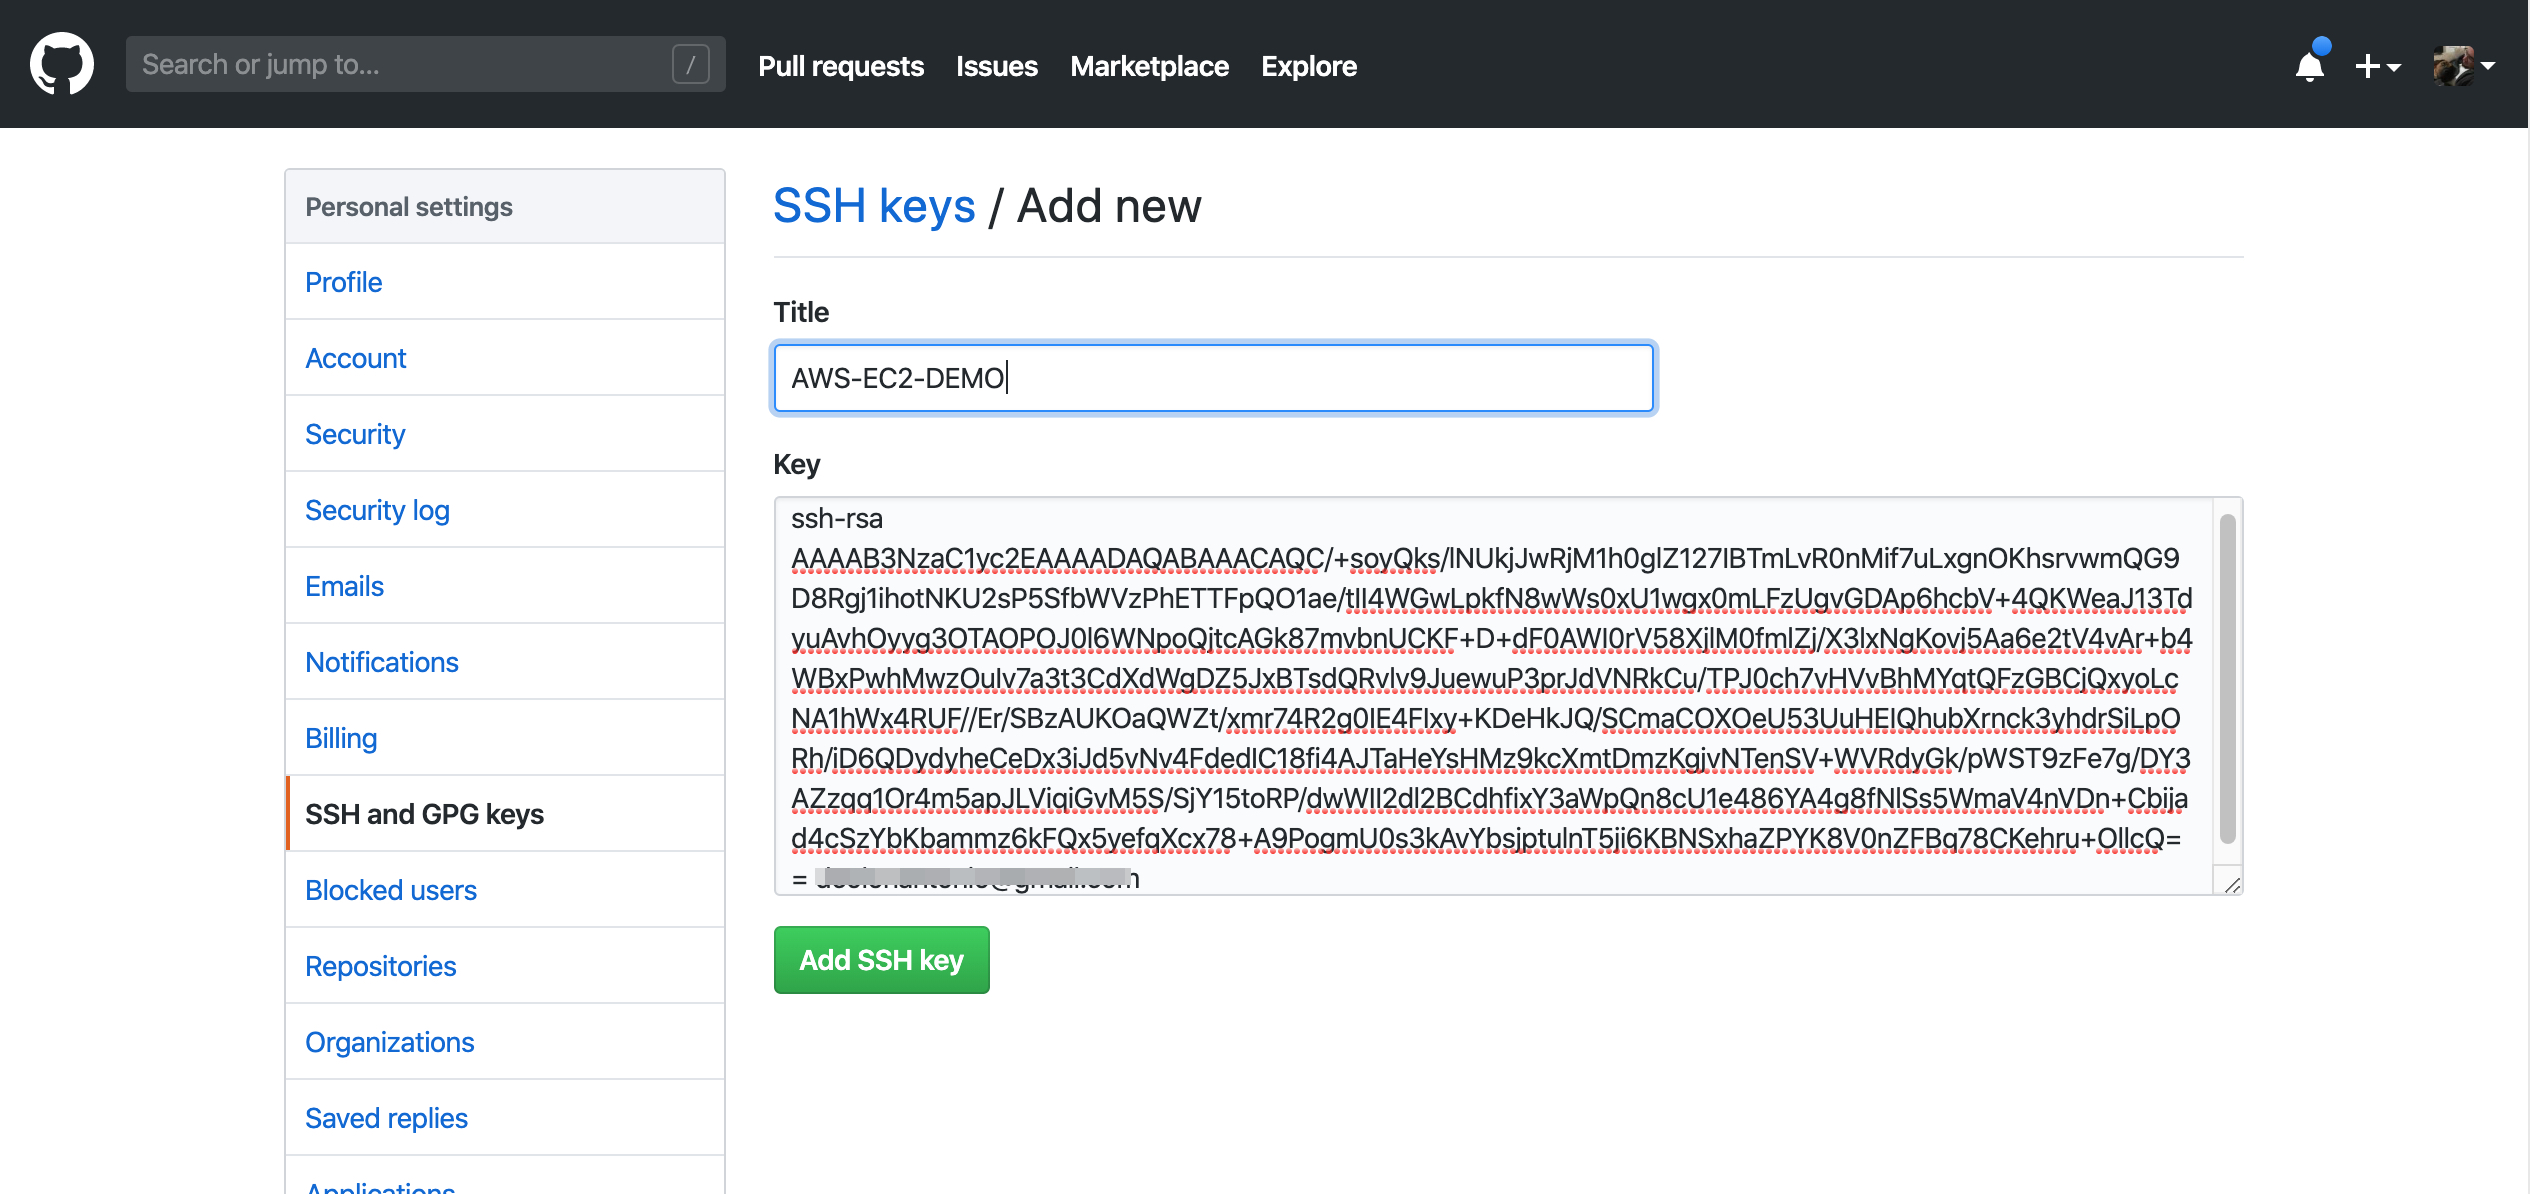
Click the "Add SSH key" button. Confirm your GitHub password. The new SSH key will be added to your account and allow access to your GitHub repositories with that key.
With our new key we can now download our project into our EC2 instance and deploy it to the web.
# Deploying Project
Go to your project's repository on GitHub and click the 'Clone or download' button to copy your repository's link. Make sure that it shows "Clone with SSH". (If not, you can click the "Use SSH" link in the upper right corner of that dialog box.)
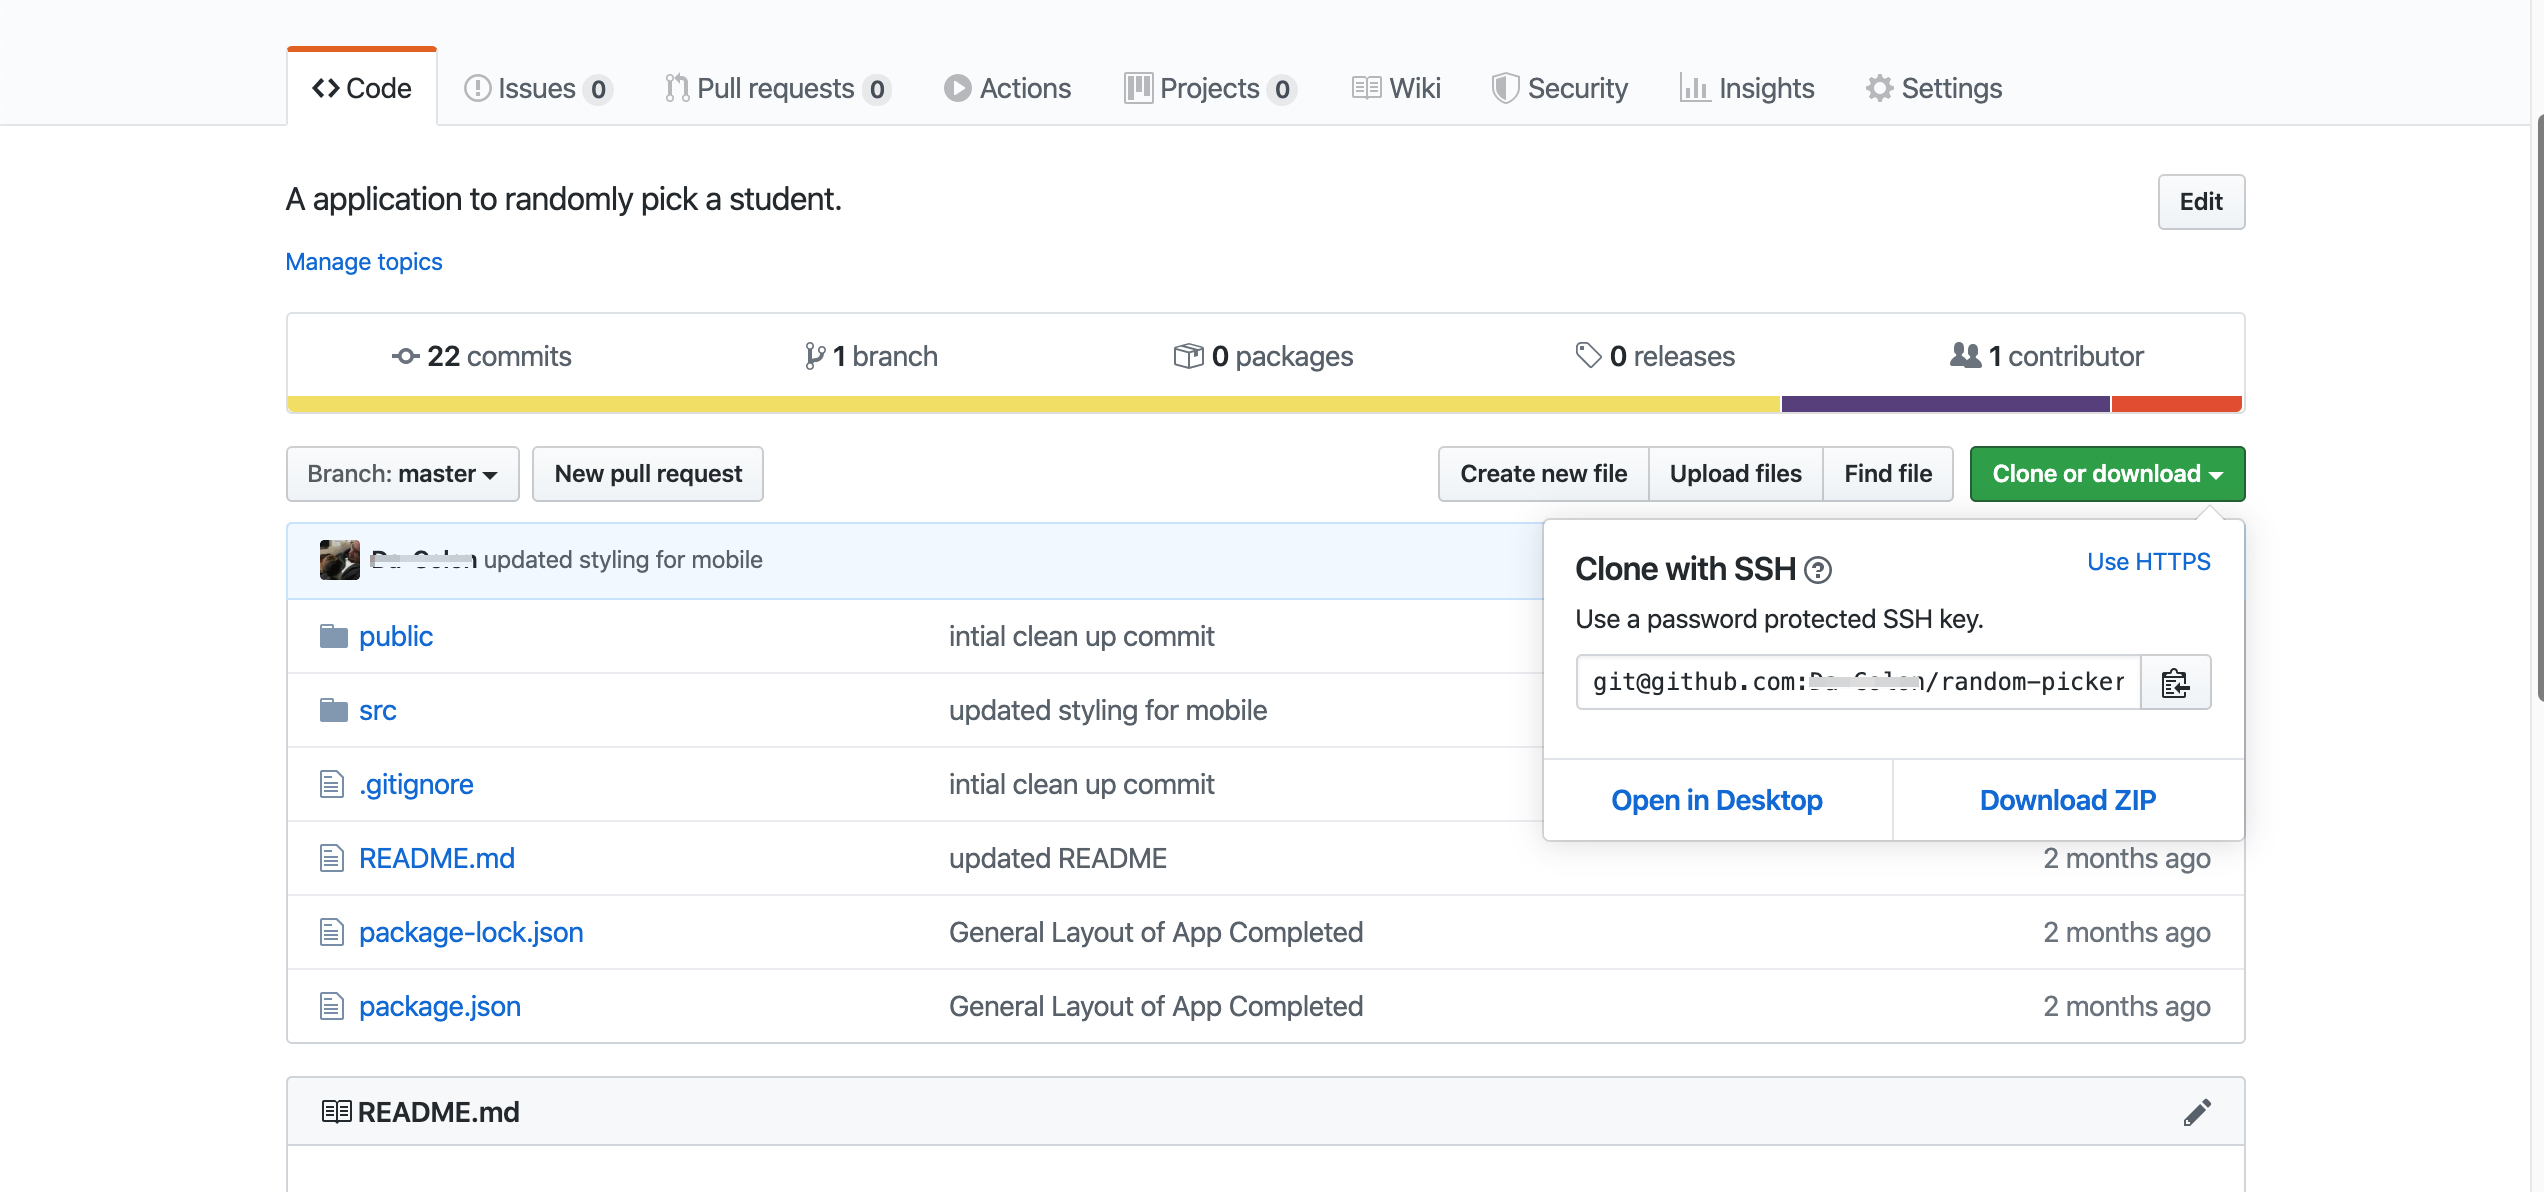
Back in your EC2 terminal git clone your project on to your server.
ubuntu@ip-172-31-46-225:~$ git clone git@github.com:<Your User Name>/random-picker.git
Since it's the first connection you should see the authenticity warning again, type yes and proceed.
Next we need to inform nginx about the location of our files that we want to deploy. In the EC2 terminal use type the following command:
ubuntu@ip-172-31-46-225:~$ sudo nano /etc/nginx/sites-available/default
Comment out anything that isn't commented out with a # on the line. Once everything is commented out, move to the bottom of the code and add our own code.
server {
  root /home/ubuntu/YOUR-FOLDER-NAME;
  index index.html index.htm;
}
2
3
4
Save the file by pressing ctrl x and then y and then press enter.
We are telling nginx where the location of the index.html is. With our changes to the sites-available/default we need to restart nginx.
ubuntu@ip-172-31-46-225:~$ sudo service nginx restart
Navigate back to the AWS instance dashboard. When your instance is selected you get details on the instance in the bottom panel.
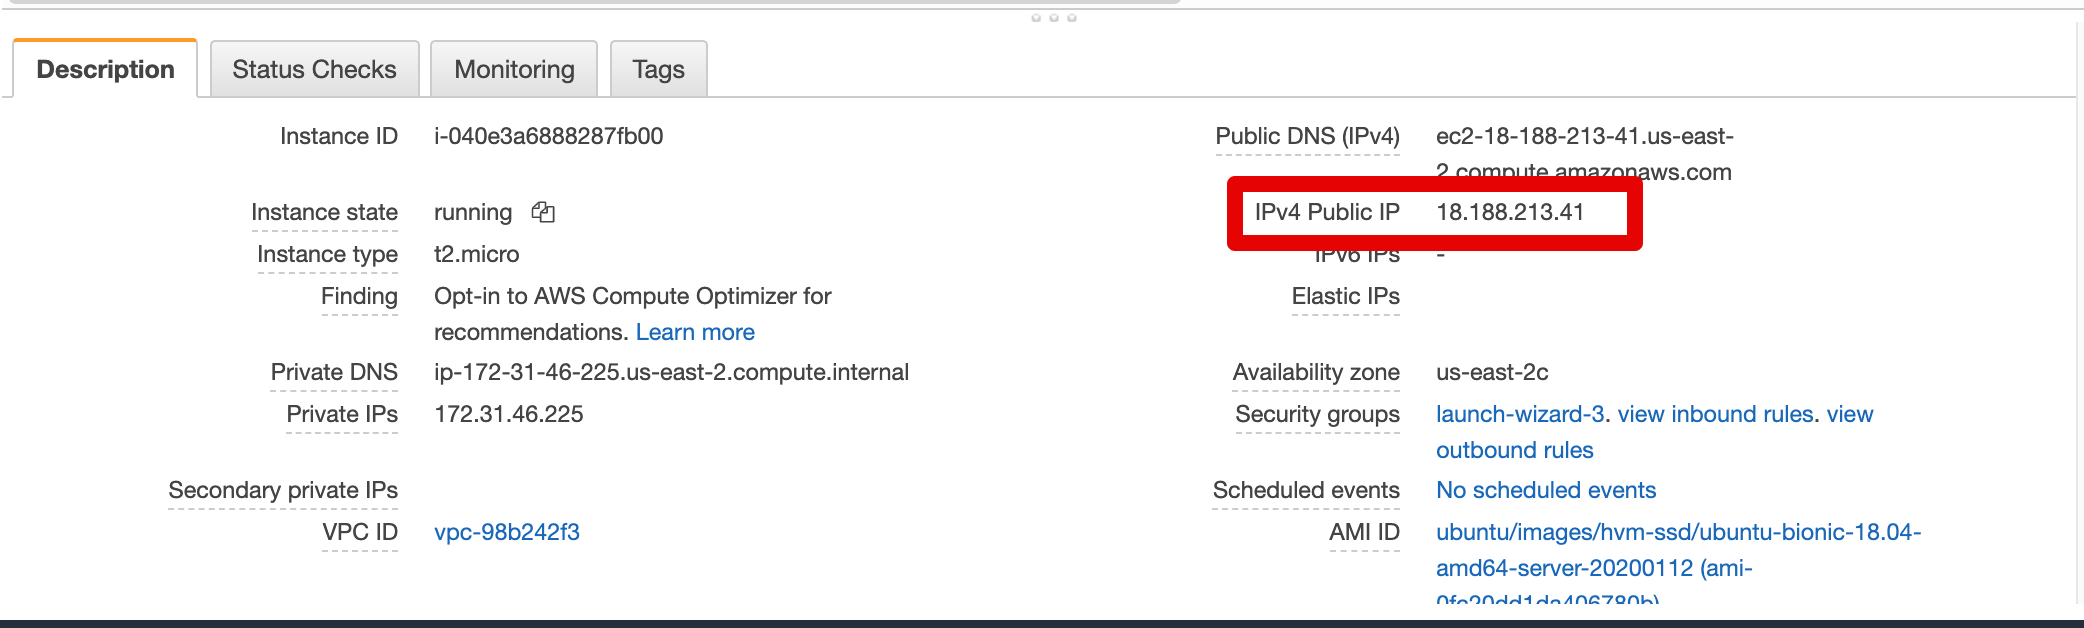
Copy the IPv4 Public IP and paste it in a new tab. You should see that your project is now deployed!
# Domain Names and Certbot
The IP address lets your browser communicate with your instance. You have configured nginx to send back your front-end project.
But an IP address is hard to remember and the network traffic is not secured. Luckily, it is easy to solve both problems. To begin, we can purchase our very own domain name. You can do so on sites like Hover, GoDaddy, or Namecheap.
After you have purchased your domain name, stay on the site and proceed to the area of the website that allows for you to manage your Domain Name Server (DNS) and create DNS records.
Add a record with the values in the following image (Each hosting site might look different).
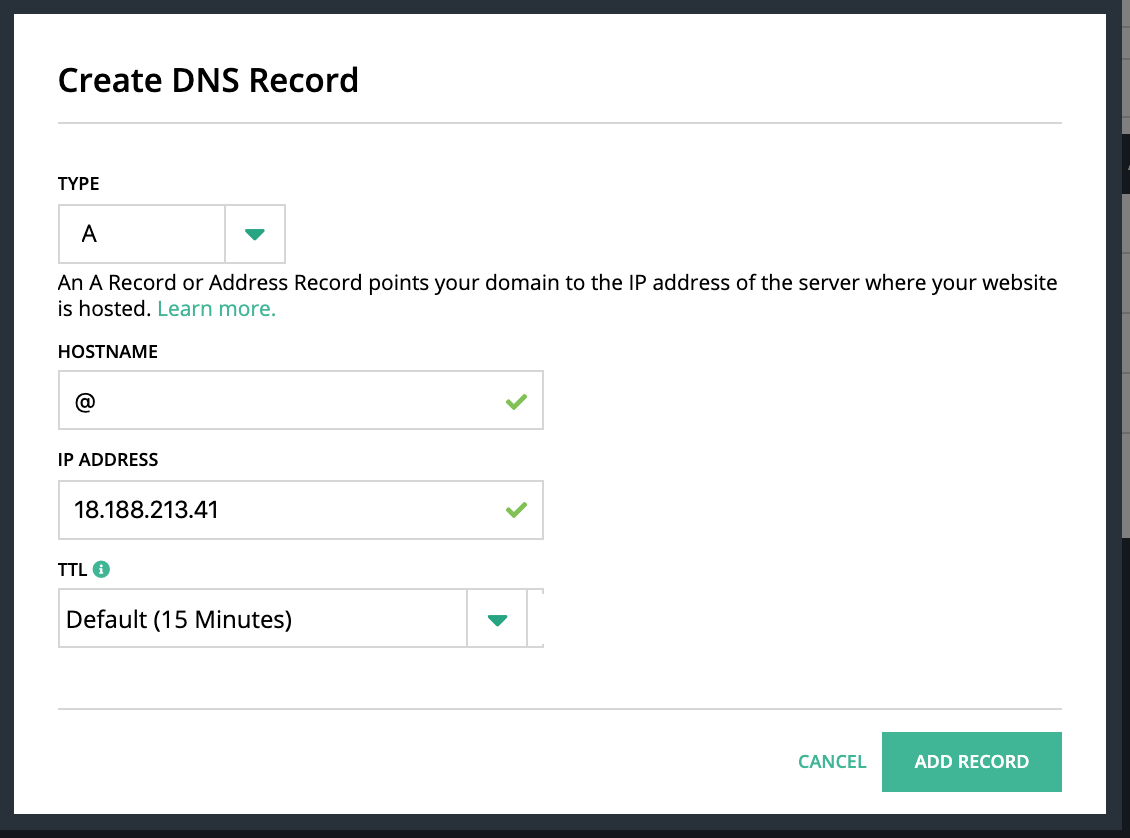
The type A is a DNS record that associates a domain with an IPv4 address.
The Hostname @ is a blank record that refers to the domain itself (e.g., without a prefix like "www").
Let's add one more record to see how you would add a subdomain.
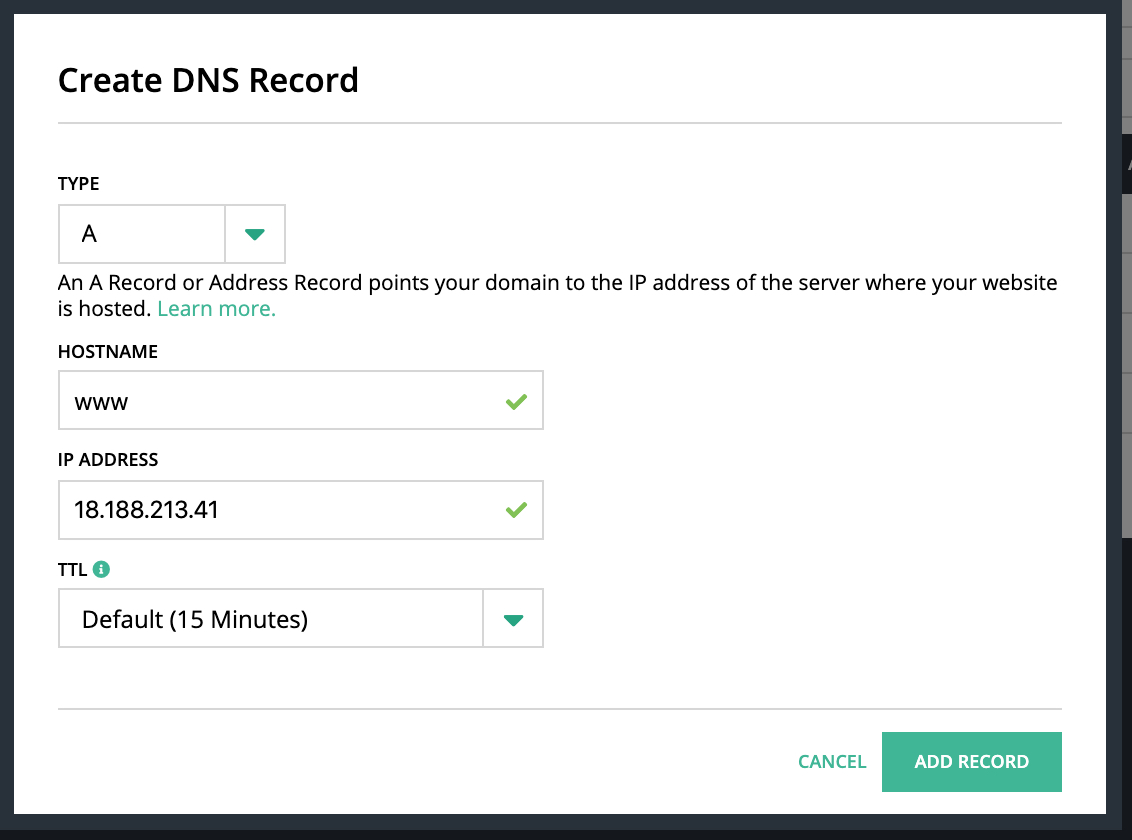
In this record we used www for the Hostname value. If someone visits www.your-domain.com in their browser, it will try to connect to nginx running on your EC2 instance.
# Add domain to nginx
To add a domain name to your server we will need to edit 'sites-available/default' again. Log back into the EC2 instance and type:
ubuntu@ip-172-31-46-225:~$ sudo nano /etc/nginx/sites-available/default
Scroll down to where you previously add our server block. Just under the root add server_name your-domain.com www.your-domain.com; It should not look similar to this:
server {
  root /home/ubuntu/YOUR-FOLDER-NAME;
  server_name your-domain.com www.your-domain.com;
  index index.html index.htm;
}
2
3
4
5
Reload the configuration file with the command
sudo service nginx restart
With this you can now visit either your-domain.com or www.your-domain.com and your website should appear.
Debugging
- You can test your server block by entering
sudo nginx -t.
# Certbot Certificates
We can access our website but notice that the connection is not secure (http). To make sure our website is secure, we can use service by Certbot. Note: you must have a domain name to tie the certificate to.
Certbot is a free, open source software tool for automatically using Let’s Encrypt certificates on manually-administrated websites to enable HTTPS. Click Here for more information
Visit the Certbot site.
Fill out the dropdowns in the My HTTP website is running 'Software' on 'System' heading. Select 'nginx' from Software dropdown and your version of Ubuntu in the System dropdown. In this lesson we have selected 'Ubuntu 18.04 LTS (bionic)'
Follow the instructions down the page. Make sure to execute these steps in your EC2 server.
The short version:
sudo apt-get update
sudo apt-get install software-properties-common
sudo add-apt-repository universe
sudo add-apt-repository ppa:certbot/certbot
sudo apt-get update
sudo apt-get install certbot python-certbot-nginx
2
3
4
5
6
To add or update (which needs to be done anytime you add a domain or subdomain) your certificate, you just need to run certbot.
sudo certbot --nginx
Restart nginx with sudo service nginx restart and visit your website again. You should now see either the lock symbol or 'https'.
# Summary
A static website is a website that has fixed content. Each page is created using only client-side tools and libraries.
AWS offers many services that help developers develop web applications and publish them to the web.
EC2 instance allows a developer to create and configure their own remote virtual web server to deploy websites.
You can use SSH keys to make secure connections between your computer and your EC2 instance. You can also use the keys connect with GitHub with Git.
Purchasing a Domain Name not only allows you to give your website a memorable address, it also allows you to create subdomains and secure your site with SSL Certificates.
# Training Exercises
To solidify your knowledge, here is a exercise that will require you to use the techniques you've just learned in the lesson above.
# Deploy a Second Website
Practice makes perfect. Deploy a second website using the same EC2 instance
# Interview Questions
# Fundamentals
- What is Amazon EC2?
- What do SSH keys do?
- What are the advantages of using web servers to host websites?
- How does nginx serve your website?