# AJAX 101
# Learning Objectives
After completing this lesson, you will be able to:
- Make AJAX requests using the
XHRobject and thefetchAPI - Interpret server status codes
- Handle AJAX server responses
# Lesson
# Overview
AJAX stands for Asynchronous JavaScript And XML. It's a way of retrieving data from a server after a webpage has loaded. Asynchronous means the process that triggers the request runs independently from the source code. Because of that, you have to track and manage the request and its subsequent response.

Credit: AJAX Introduction - w3schools.com
As seen in the diagram above, the browser creates and triggers an XMLHttpRequest and then the server sends a response back to the browser. You can then use JavaScript to manipulate the DOM and provide feedback to the user.
# XHR Object
To make your first AJAX request, you will use the XMLHttpRequest object.
const request = new XMLHttpRequest();
There is an event listening property on the object called onreadystatechange that will be triggered every time the request updates to the browser.
const request = new XMLHttpRequest();
request.onreadystatechange = function() {
  console.log(this);
};
2
3
4
What is `this`?
this in the code sample above refers to the XMLHttpRequest object. You can learn more about how the this keyword works on MDN web docs - this
Now that you have the event listener defined, you have to specify what kind of request method you want to use. The most common HTTP request methods are as follows:
| Method | Description |
|---|---|
GET | Requests data from a resource |
POST | Sends data to create a new resource |
PATCH | Sends data to update an existing resource |
DELETE | Deletes a specific resource |
For this lesson, we are going to stay focused on the GET method. You initialize the HTTP response method using the open() function. The first argument is the method type, the second argument is the URL to the resource.
const request = new XMLHttpRequest();
request.onreadystatechange = function() {
  console.log(this);
};
request.open("GET", "./sample.txt");
2
3
4
5
Finally, you call the send() function to execute the request.
const request = new XMLHttpRequest();
request.onreadystatechange = function() {
  console.log(this);
};
request.open("GET", "./sample.txt");
request.send();
2
3
4
5
6
# Creating a Server
A browser will only fetch data from a server. A simple way to simulate a server is using the Live Server vscode extension. Once installed, run the Live Server: Open with Live Server command.
The browser will open and if you look at your console logs you will see the this contents from our function displays the following results.
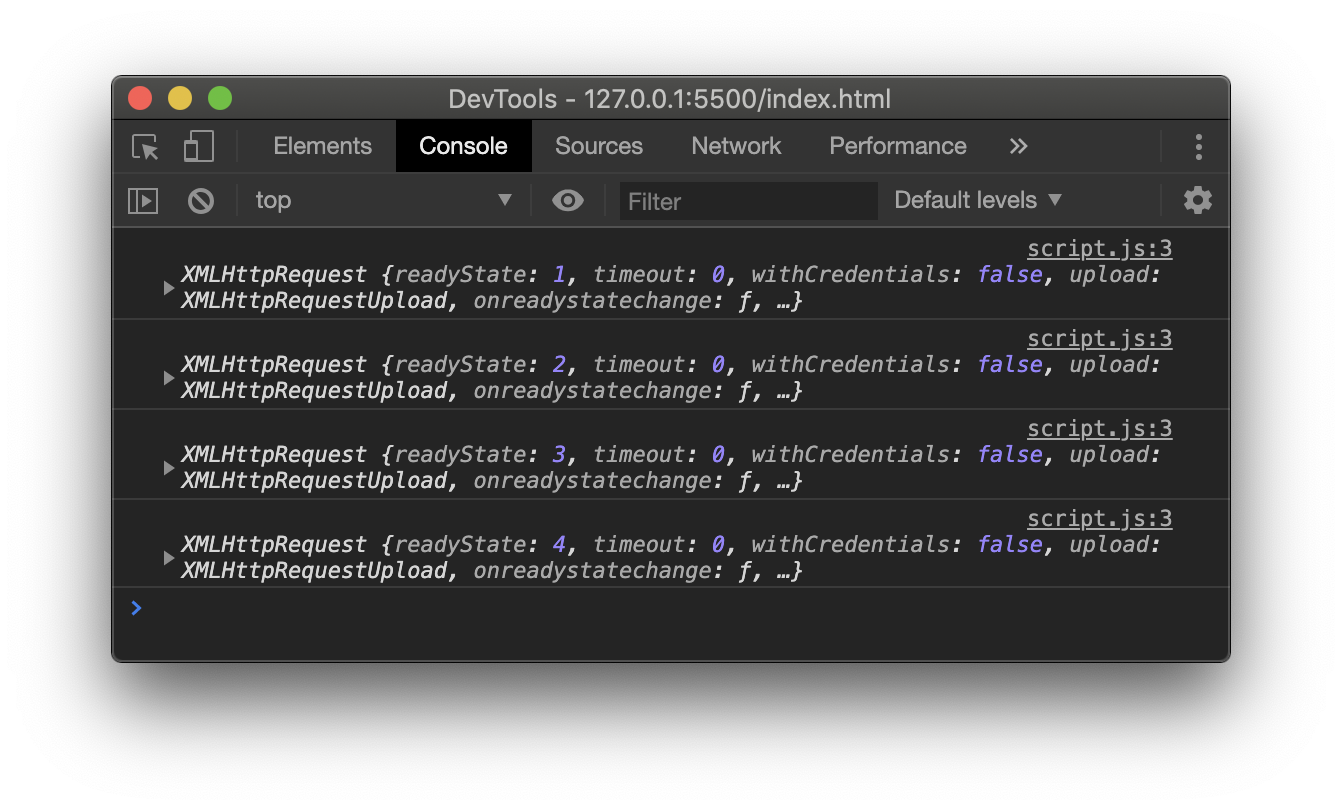
You can see the requests logged multiple times, this means everything is working correctly. Now that we know it's working, there are a couple of items we need to address.
# State Change
When running the existing code, the onreadystatechange function fires multiple times. This is because there are multiple state changes on the request.
| Ready State | Description |
|---|---|
| 0 | Request not initialized |
| 1 | Server connection established |
| 2 | Request received |
| 3 | Processing request |
| 4 | Request finished and response is ready |
For our code sample, we will check that the ready state is finished and the response is ready by checking the ready state is at 4.
const request = new XMLHttpRequest();
request.onreadystatechange = function() {
  if (this.readyState === 4) {
    console.log(this);
  }
};
request.open("GET", "./sample.txt");
request.send();
2
3
4
5
6
7
8
Running this code you will see that the console log only appears once after the response is ready.
# Status Codes
Even though we received a response, it may contain an error message instead of the data we want. Luckily, the server adds a status code to every response. By looking at the status code, we can determine if the request was successful. There are many status codes, but an individual status code falls in one of these categories:
| Code | Description |
|---|---|
| 100–199 | Informational |
| 200–299 | Successful |
| 300–399 | Redirects |
| 400–499 | Client errors |
| 500–599 | and Server errors |
Our code will check for status 200, which is the standard status code for successful requests.
const request = new XMLHttpRequest();
request.onreadystatechange = function() {
  if (this.readyState === 4 && this.status === 200) {
    console.log(this);
  }
};
request.open("GET", "./sample.txt");
request.send();
2
3
4
5
6
7
8
Congratulations! You made your first AJAX request! Looking back at our code, it was only 5 steps:
- Create an
XMLHttpRequestobject - Add an
onreadystatechangeevent handler function - Set your handler function to check for a final
readyStateand a successfulstatus open()the requestsend()the request
# Fetch API
Another way is to use fetch(). The fetch() function is built into modern browsers. It simplifies the process of making AJAX requests and uses Promises to handle your asynchronous code.
Here is an example of using fetch() to make the same AJAX request:
fetch("./sample.txt").then((response) => {
  console.log(response);
});
2
3
By default, fetch() makes GET requests. You pass in the URL to the resource you want. You chain a call to .then() and pass in your handler function.
What took 8 lines before only takes 3 with fetch()! Because it uses promises you also have more control of when and how you use the request data.
# Summary
AJAX is a powerful technique. It allows you to request data from the server without reloading the page. When combined with DOM manipulation, you can transform your static web pages into dynamic web applications with rich interactivity.
In this lesson, you learned two ways of creating AJAX requests: manually creating an XMLHttpRequest object and the much simpler fetch() function. You also learned how to use status codes to determine whether your request was successful. Finally, you got a sneak peek at using Promises for writing asynchronous code.
# Training Exercises
To solidify your knowledge, here are a set of exercises that will require you to use the techniques you've just learned in the lesson above.
They are organized into small, medium, and large sized problems. The small exercises will be very similar to the examples in the lesson. If you get stuck, refer to the relevant section above. The medium exercises will require you to combine concepts. The lesson may not have a single, specific example for you to reference. The large exercises are more open-ended and may require you to search the web for additional material.
# Small
# XHR Request
Repeat the example in the lesson by creating a XMLHttpRequest object and get a simple text file. Log the response data in the console.
View XHR Request Solution
<!DOCTYPE html>
<html lang="en">
  <head>
    <meta charset="UTF-8" />
    <meta name="viewport" content="width=device-width, initial-scale=1.0" />
    <title>Simple XHR Request Solution</title>
  </head>
  <body>
    <script>
      var request = new XMLHttpRequest();
      request.onreadystatechange = function() {
        if (this.readyState === 4 && this.status === 200) {
          console.log(this);
        }
      };
      request.open("GET", "./sample.txt");
      request.send();
    </script>
  </body>
</html>
2
3
4
5
6
7
8
9
10
11
12
13
14
15
16
17
18
19
20
# Fetch Request
Repeat the example in the lesson by creating a fetch request and get a simple text file. Log the response data in the console.
View Fetch Request Solution
<!DOCTYPE html>
<html lang="en">
  <head>
    <meta charset="UTF-8" />
    <meta name="viewport" content="width=device-width, initial-scale=1.0" />
    <title>Simple Fetch Request Solution</title>
  </head>
  <body>
    <script>
      fetch("./sample.txt").then(response => {
        console.log(response);
      });
    </script>
  </body>
</html>
2
3
4
5
6
7
8
9
10
11
12
13
14
15
# Medium
# Weather App
Create a basic weather app that does the following:
- Gets the weather from the Open Weather API. Make sure to sign-up and use your API key and location.
- Update the DOM to display the current weather on the page to the user.
fetch(
  "http://api.openweathermap.org/data/2.5/weather?q={city name}&appid={your api key}"
);
2
3
View Weather App Solution
<!DOCTYPE html>
<html lang="en">
  <head>
    <meta charset="UTF-8" />
    <meta name="viewport" content="width=device-width, initial-scale=1.0" />
    <title>Weather App Solution</title>
  </head>
  <body>
    <h1>Today's Weather Condition in Houston</h1>
    <h2 id="weather">Loading</h2>
    <script>
      fetch(
        "https://api.openweathermap.org/data/2.5/weather?q=houston&appid={your-api-key}&units=imperial"
      )
        .then(response => response.json())
        .then(body => {
          document.getElementById("weather").innerHTML = body.main.temp + "°";
        })
        .catch(error => alert("Please add your api key to the fetch url"));
    </script>
  </body>
</html>
2
3
4
5
6
7
8
9
10
11
12
13
14
15
16
17
18
19
20
21
22
# Large
# Movie Search
Create a form that allows you put in a movie, click 'search', then display a result of movies that match the query.
- Create an account for The Movie DB API
- Use the
/search/movieendpoint - Create an form with an input for the movie query and trigger the AJAX request when the form is submitted
- Display the results to the user with DOM manipulation
View Movie Search Solution
<!DOCTYPE html>
<html lang="en">
  <head>
    <meta charset="UTF-8" />
    <meta name="viewport" content="width=device-width, initial-scale=1.0" />
    <title>Movie Search Solution</title>
  </head>
  <body>
    <h1>Movie Search</h1>
    <form id="search-form">
      <label for="query">Movie Title</label>
      <br />
      <input
        type="text"
        name="query"
        id="query"
        placeholder="Enter movie title"
      />
      <br />
      <button>Search</button>
    </form>

    <h2>Results</h2>
    <ul id="results"></ul>

    <script>
      document
        .getElementById("search-form")
        .addEventListener("submit", function(event) {
          event.preventDefault();
          const searchValue = document.getElementById("query").value;
          let url = "https://api.themoviedb.org/3/search/movie";
          url += `?api_key={your api key here}`;
          url += `&query=${encodeURI(searchValue)}`;
          fetch(url)
            .then(response => response.json())
            .then(responseData => showResults(responseData.results))
            .catch(error => alert("Make sure to put your API key in the code"));
        });

      function showResults(results) {
        results.forEach(result => {
          let item = document.createElement("li");
          item.innerHTML = result.title;
          document.getElementById("results").appendChild(item);
        });
      }
    </script>
  </body>
</html>
2
3
4
5
6
7
8
9
10
11
12
13
14
15
16
17
18
19
20
21
22
23
24
25
26
27
28
29
30
31
32
33
34
35
36
37
38
39
40
41
42
43
44
45
46
47
48
49
50
# Interview Questions
# Fundamentals
- What is AJAX?
- How do you send an AJAX request in JavaScript?
- List advantages and disadvantages of using AJAX
# Bugfix
None for this lesson.
# Conceptual
None for this lesson.
# Architect
None for this lesson.